Showing posts with label free pattern. Show all posts

Sunday, 28 October 2012

The Hooded Simon - a knitting pattern

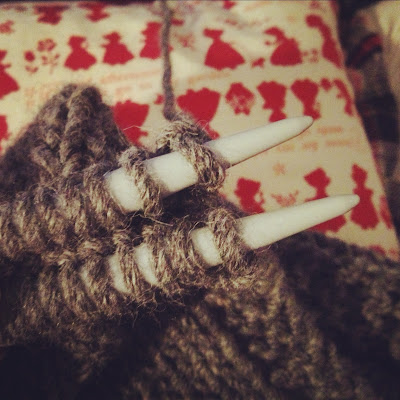
Will I be shot by the Sun-lovers if I admit that I'm in trans-seasonal bliss right now? The temperatures are erring towards freezing and the clocks have gone back eliminating another hour of sunlight; there are still heaps of crispy Autumn leaves everywhere fresh for the frolicking, and still a week to go before all the fireworks and mulled wine and toffee apples... It is getting seriously cold though. Perfect timing, then, to make a start on this year's snood, or Simon, as I will from now on be calling them, thanks to Kathryn of Yes I Like That. Made from Toft's chunky alpaca yarn and 10mm circular needles, this guy was knit in an evening and a half and has been warming my scalp ever since. Here's how:


You will need:
Gauge: 10 stitches / 14 rows = 4"


Cast on 60 stitches. Being careful not to twist your stitches, join to work in the round.
Knit 6 rounds of garter stitch (knit one round, purl one round, repeat).
Knit approx 22 rounds of stockinette stitch (just knit rounds), or until your snood is as deep as you want it to be around your neck.
Next round: knit 17, purl 26, knit 17. This sets up the width/depth of the hood. To adjust, increase or decrease the number of knit stitches either side or the purls - and obviously decreasing/increasing the number of purls accordingly to keep the number of stitches in the round consistent. This hood was designed to sit perfectly on the head as in the picture, therefore I would advise against making the hood shallower.
Next round: knit.
Repeat the last 2 rounds twice more.
Next round: knit 20, bind off 20 stitches, knit 20.

Working the hood:

Now, still on the circular needles, but now working in rows knitting the hood back and forth:
Row 1: purl 37, knit 3.
Row 2: knit 37, purl 3.
Continue in this manner, repeating rows 1 & 2 until your hood reaches your desired length (mine is quite long - it's to hold all my hair, of which I have a lot).
End on a knit row - as if you were just about to begin another row of purls.

Closing the hood:

The best way to close the hood (in my opinion) is with the kitchener stitch: holding the needles together (wrong sides of the work facing), cut the yarn leaving a nice long tail (about 4 times the length of what you'll be stitching o be safe). Thread on a yarn needle and following this great video tutorial, close the hood with the kitchener stitch.


You could, alternatively, cast off at this point and with right sides together stitch the top of the hood closed, or cast off both sides of live stitches with a 3 needle bind off. Man, wouldn't it be fun to make knitting technique video demonstrations? But in a really fun (& still instructional) way...?


With the advantage of hindsight, next time I make this I will avoid the silvery grey colour... Let's face it - I'm reminding you a bit of a knight in a chain maille hood, am I right?? A super cosy knight, mind you.

Wednesday, 7 March 2012

Tutorial ~ Easy Peasy Pleated Miniskirt


So for a moment there it actually looked like Spring... Never mind, armed with my sewing machine and some Hawaiian-style surfer print cotton, it still can be.  At least until it really is.  So grab yourself a couple of metres of fabric that makes you happy*, stick on the following playlist, and let me quickly show you how to make this supercute pleated miniskirt.


You will need:

2m fabric
1m ribbon for the waist fastening (cut in half)
invisible zipper (approx 6 inches long)
sewing machine with matching thread
measuring tape
pins
scissors

Start with the waistband.  Cut a rectangle of fabric that measures about 6 inches deep (double the depth it will be once folded plus seam allowance) by your own waist measurement in inches,  plus 1 inch on each side seam allowance (generous allowance I know, but better to add extra so you can let some out if you need to!).  This waistband will be meeting at centre back (like this one), not overlapping, so no fannying around with hooks and eyes or buttonholes, we'll just be sewing some ribbon into the seam to make for a pretty bow tied in back.

Fold your rectangle in half lengthwise, wrong sides together, and press.  Then open it up and, right side facing you, place your lengths of ribbon at each end, aligned with the fold.
    Fold over again, this time right sides together sandwiching the ribbon, and stitch those short ends with a 1 inch seam allowance.  Turn right side out and double check that it still fits your waist before trimming seam allowance!


    Now we need to make three little notches along the raw edge that will correspond to three little notches on the fabric for the skirt to make sure the pleats are evenly spaced.  Do this by folding the waistband in half, snip a notch at the fold (centre), then fold in half again and snip that fold (quarters).

    At this point you'll need to decide which side of your waistband is the outside and which is the inside.  The fabric I used for the waist had some grass print so obviously I went for the side where the grass was right way up.  Now press the notched edges inwards, with the inside of the waistband slightly deeper than the outside - this is so that when you come to edge stitch the waistband to the skirt, you'll be sure that the needle will go through all the layers.

    The skirt!  Cut a big rectangle approximately double the width of your waistband (or wider if you want more pouff) and however long you want your skirt to be, adding at least three inches for seam and hem allowances.  Always better to cut longer and shorten than to cut too short.  Press the side edges in by half an inch.


    Make three notches along the top in the same manner as for the waistband.

    Open up your waistband so you can see the notches and match up the central notches on the band and skirt.


    Pin the skirt to the inside of the waistband where the notches correspond.

    Arrange the pleats evenly between the notches and securely pin into place.


    When you're happy with the arrangement, fold the top of the waistband over and pin close to the fold.  When you turn your skirt to the wrong side, make sure that the pins are also holding the inside folded edge of the waistband also.

    Time to insert the invisible zipper... For some reason, despite having sewn countless invisible zippers, I always find it a daunting task.  Then I do it, remember how easy it is and feel a bit silly.  Either way I'm not going to try to walk you through it myself... I'll hand you over to the professionals at the Coletterie for a proper tutorial instead!  One word of advice though: make sure you lower the setting on your iron if you want to avoid melting/curling up your zip... Like I did...

    silly me...
    much better

    Now you can edge stitch the waistband to the skirt!  Stitch with the right side facing you keeping your stitches as neat as possible and close to the fold.


    Seeing as you pressed the waistband so the inside fold would come down a little lower, all three layers should have been caught as you edge stitched the outside.

    All that's left to do is the hemming!  Make sure you try on the skirt first so you can be sure to mark the length you want.  Then press the hem in twice and stitch.


    Done!  


    *Preferably a lightweight woven fabric like cotton, but would look equally cute in jersey too - although I'd only recommend that to sewers with a little experience sewing with knits.  Non-stretch fabrics are much easier to work with if this is your first attempt!

    Monday, 13 February 2012

    Batman & Catwoman


    My latest knits could not have been more perfectly timed.  As I sat knitting by a roaring fire, sipping a glass of 1934 Armagnac, eating Narnia-worthy turkish delight and merrily discussing Quantum Mechanics, this year's first snowflakes began to fall.


    By morning, the snow had settled, the ponds were frozen and my little caped crusader and I each had a new masked Superhero Hat.


    The design was inspired by this Catwoman Hat I had recently seen on Pinterest, and with its ingeniously simple construction, it was a dream to knit.  A fast and seamless knit on circular needles, and using less than a skein of Rowan's Big Wool for each hat, I know this will be something I will make over and over again. In fact, if you know me, let me know if you don't want one of these for your next birthday!


    Thursday, 27 October 2011

    Misty Monday Morning Kit ~ mittens & cowl knitting pattern


    ~ Making your way to work when it's barely even light ~ Bundling into a frozen car, still in pjs, on the school run ~  Dragging yourself + kids + dogs to the park on a miserably drizzly morning ~

    Ok, so it's not yet that cold here yet... But it's definitely getting there.  This winter kit knits up so fast that you won't even have time to feel the cold.  And using only 4 50g balls of Debbie Bliss Como (now discontinued so get it for around £3 a ball on eBay), we're talking unspeakable luxury for little more than £12.  I'll be keeping this set myself, but will definitely be making up a few more as Christmas gifts...


    Mittens (make 2)

    Size: Adult
    Gauge: 10 stitches = 10cm/4"

    2 x 50g balls Debbie Bliss Como, main colour (leftovers to be kept for neck-warmer)
    1 x 50g ball Debbie Bliss Como, contrast colour
    8mm DPNs
    10mm DPNs
    2 stitch markers
    crochet hook (5-7mm)
    yarn needle to sew in tails

    Abbreviations
    DPN - double pointed needle
    MC - main colour
    CC - contrast colour
    CO - cast on
    BO - bind off
    st(s) - stitch(es)
    k - knit
    p - purl
    rnd(s) - round(s)
    rep - repeat
    cont - continue
    k2tog - knit 2 stitches together
    SM - stitch marker
    dec - decrease

    Cuff & Thumb Gusset

    Using 8mm DPNs and your CC, CO 20 sts, arrange over 3 needles (7 sts on 2 of the needles and 6 on the 3rd) and join to work in the round being careful not to twist your sts.
    Work 6 rnd of k2 p2 ribbing.
    next rnd: switch to MC and work a further 4 rnds of k2 p2 ribbing (10 rnds ribbed cuff).
    rnd 11: switch to 10mm DPNs and knit, placing a SM in between the penultimate and last sts.
    rnd 12: k1, place SM, knit to 1st SM  ~This is the set up for the thumb gusset.  If this is your first time knitting mittens, this might all sound a little scary.  It's really not - watch this tutorial before continuing to get a visual of the process~ m1 after 1st SM and again before 2nd SM.
    next rnd: knit.
    You will be increasing sts like this just inside of each SM to create the thumb gusset every other rnd, knitting the alternating rnds.  Cont until gusset has 10 sts.  Slip these 10 sts onto a piece of scrap yarn.

    Main Body

    CO 2 sts using the thumb technique onto the last needle in the rnd and join mitten, continuing with the 20 sts originally cast on.
    Knit 13 rnds (or more depending on length of fingers - but you need to leave a generous inch to decrease), then dec like this:
    *k2, k2tog* rep for rest of rnd.
    next rnd: knit.
    next rnd: *k1, k2tog* rep for rest of rnd.
    next rnd: knit.
    Cont until you have 10 sts remaining. Close the mitten using the Kitchener Stitch.

    Thumb

    Pick up 14 sts - the 10 held by the scrap yarn and 4 more to close the gap. Knit one rnd, and on the 2nd rnd, dec 4 sts by k2tog evenly spaced along the inside of the thumb - decreased sts on the outside will be visibly and make the thumb look a little odd.
    Knit 4 rnds (or more depending on thumb length).
    next rnd: k2tog to end.
    next rnd: knit.
    Cut yarn and thread onto a yarn needle.  Slip off rem 5 sts onto needle (purlwise) and pull tight. 
    Weave in all loose ends.

    Make a crochet loop to attach to cuff to hang mittens (optional, but if you do - chain 20).


    Neck-Warmer

    less than 1 50g ball Debbie Bliss Como, main colour leftover from mittens
    just under 2 50g ball Debbi Bliss Como, contrast colour leftover from mittens cuff
    8mm DPNs
    10mm circular needle (or DPNs)
    yarn needle to sew in tails

    Using 8mm DPNs and MC, CO 60 sts, arrange over 3 needles (20 on each) and join to work in the round being careful not to twist your sts.
    Work 5 rnds of k2 p2 ribbing. 
    rnd 6: switch to CC and cont in k2 p2 rib for a further 2 rnds.
    rnd 9: switch to 10mm needles and knit in stockinette st until you've almost used up your CC yarn - leaving enough to switch back to your 8mm DPNs for 2 rnds of k2 p2 ribbing.  Switch back to your MC yarn and work 5 rnds k2 p2 rib, and cast off.
    Weave in loose ends.  Done!


    Keep this kit by your front door and forget numb fingertips and chills down your spine (the cold ones at least!).

    Sunday, 25 September 2011

    Sleepy Polar Bear Hat - knitting pattern

    There's nothing quite like a cute, cosy hat for your kid that knits up super fast to make you feel like the queen of domestic productivity.  So good, it had to be shared.


    ~ Sleepy Polar Bear Hat ~

    Materials
    2 x 100g skein of bulky-super bulky weight yarn (I used some delicious local natural yarn I found in my favourite craft shop which was unlabelled)
    scrap of brown yarn, to embroider the bear's eyes and nose
    set of 5 7mm DPNs
    3 stitch markers or scrap yarn
    yarn needle

    Gauge: 1" = 3 stitches / 4.5 rows
    Size: Child, fits ages 2 - 4

    Abbreviations
    k - knit
    p - purl
    st st - stockinette stitch
    k2tog - knit 2 stitches together
    st(s) - stitch(es)
    rnd - round
    cont - continue
    rep - repeat
    SM - stitch marker
    CO - cast on
    BO - bind off


    Starting with the ear flaps ~

    CO 4 sts.  Knit 1st row.  Turn.
    row 2: k1, m1, k2, m1, k1 (6 sts).
    row 3: knit.
    row 4: k1, m1, k4, m1, k1 (8 sts).
    row 5: knit.
    row 6: k4, m1, k4 (9 sts).
    row 7: k4, p1, k4.
    row 8: k4, m1, k1, m1, k4 (11 sts).
    row 9: k4, p3, k4.
    row 10: k4, m1, k3, m1, k4 (13 sts).
    row 11: k4, p5, k4.
    row 12: knit.
    row 13: k4, p5, k4.
    Rep rows 12 & 13 3 times altogether.  Cut yarn, keeping sts on the needle.  Make another ear flap in the same way.

    Hat ~

    CO 7 sts.  Turn the needle so the working yarn is on the left.


    Knit 11 sts from one ear flap, then bring in another DPN to knit the remaining 2 sts.


    Turn and CO 14 sts, turn (again so you have working yarn on the left) and knit 2 sts from 2nd ear flap.
    Take a 3rd DPN and knit remaining 11 sts from ear flap, turn, CO 7 sts.


    Join, being careful not to twist sts, to begin working in the round (you will have 54 sts altogether; 18 on each needle):

    rnd 1: purl, knitting the 5 knit sts in ear flaps.
    rnd 2: knit.
    Rep rnds 1 & 2 3 times, then cont knitting in st st until hat measures 5" deep.

    Crown ~

    Prepare to decrease like this:
    k9, place SM, k remaining 9 sts from needle.  Rep this on each needle, so you have 3 SMs in the centre of each needle.


    Decrease ~

    rnd 1: k until 2 sts remain before SM, k2tog, k until 2 sts remain on needle, k2tog.
    rnd 2: knit.
    Rep rnds 1 & 2 7 times altogether, until 12 sts in total remain.
    Cut yarn leaving a 5" tail.  Thread this onto a yarn needle and slip each st purlwise, pulling tight to close the hole.  Secure and sew in all loose tails.


    Bear Ears (make 2) ~

    CO 3 sts.  Knit 1st row.  Turn.
    row 1: k1, m1, k1, m1, k1 (5 sts).
    rows 2 & 3: knit.
    row 4: k2, p2, k2.
    row 5: k2, m1, k1, m1, k2 (7 sts).
    row 6: k3, p3, k2.
    row 7: knit.
    Rep rows 6 & 7 once more.
    BO, leaving a long enough tail to sew the ears to the hat.
    Using the picture as a guide, sew ears to hat.  


    Using your scrap of brown yarn, embroider the sleepy bear eyes and nose - either copy how I did it using the picture as a guide, or make up your own.


    All done!  And now I might just make a whole family of these... And try out various ear-style possibilities...

    Monday, 29 August 2011

    Preparing for Autumn ~ part IV

    Coming back to my list of Autumnal projects, I am finally ready to get a shimmy on with my long-awaited Herringbone Cowl from the one and only Purlbee.  I'd made a start on unravelling the unwanted Maxmara cardi back in July, but like a lot of things, it had to be temporarily put on hold as I went on holiday/made various birthday presents/did some sewing for Self-Stitched-September '11 (still haven't made any trousers and only two days to go...).

    the original unwanted Maxmara cardi


    beginning to unravel before summer

    It's been feeling already very Autumnal these days, and I haven't had the pleasure of feeling some delicious yarn slinking through my fingers in an uncharacteristic length of time, so I spent a recent rainy afternoon unravelling the rest - while watching Ice Age 3 for the millionth time - and gently soaking the skeins in my bathroom sink (warm water and Ecover Delicates handwash liquid) to get out the kinks.


    washed, dried and ready to be balled up

    This has been a really wonderful process.  As with most things, I like there to be several different parts to a project; different skills applied, different rhythms, a diverse and prolonged experience to keep things interesting.  This idea of unravelling an existing garment to re-knit into something new certainly adds a few more stages to the handknitting process, but also feels very cyclical, and lends a greater sense of purpose to the craft (rather like a more accessible version of shearing your sheep-dyeing the fleece-spinning the yarn-knitting warm jumpers for your family).  I think that knitting can definitely be seen as a dated craft; relevant to a Make-do-and-Mend philosophy.  Quite the opposite in fact, knitting is a very expensive hobby.  Unless you go down the squeaky acrylic yarn route, good quality, natural fibres don't come cheap.  Charity shop jumpers, on the other hand, will probably cost less than a measly 100g skein of good yarn.  This method of unravelling thrifted knitwear to re-knit could well be my answer.  Inexpensive, interesting and re-creative.  Just bear in mind these prerequisites when sourcing knitwear to unravel: the bulkier the yarn the better, the bigger the garment the better, and always go for quality.


    And now, to cast on.
    Related Posts Plugin for WordPress, Blogger...
    Related Posts Plugin for WordPress, Blogger...