Showing posts with label kids. Show all posts

Tuesday, 4 December 2012

Advent 2012

Oh man I love this time of year. The dark days, the bitter chill, the cosy evenings, the fact that it's practically a crime not to fatten oneself up on stews and roasts and pies and puddings and... And I know I shouldn't be wishing my life away but I can't deny that I do spend most of year looking forward to now. Thank goodness then, that some clever soul thought up an Advent Calendar to help us squeeze every last tinsel clad drop out of the festive season before it's all over, all over again!


This is the Advent Calendar I made last year (tutorial here) and it really was the best I've ever had - for each day we thought of a little Christmassy something to do, with the odd treat or silly present hidden in random pockets. Last year my little man (who was three at the time) would get such a kick out of finding the right numbered pocket every morning, while I got all over excited about decorating the tree and making infinite batches of some cakey deliciousness or other! This year he's wanted to be more involved in the planning of our calendar, thinking up ideas of how he'd like to spend his holidays, and dedicating long hours to the decoration of his den... hmmn... let's just say he's nicked my favourite star fairy lights, and I'm down an entire roll of doubled sided tape and box of rhinestones. I'm actually a little envious. It looks really cool.


~ Advent Activity List 2012 ~

1. Pancakes for breakfast!
2. Decorate the Christmas tree.
3. Write a letter to Father Christmas.
4. Decorate the den.
5. Read stories about Saint Nicholas.
6. Go to our local street party to see the Christmas lights being switched on.
7. Hang out wreath.
8. Read stories about Hanukkah.
9. Movie night! Make popcorn and watch Christmassy movies.
10. Make Christmas cards for family and friends.
11. Gather unwanted toys, books, clothes etc and donate to charity.
12. Ice-skating at the Natural History Museum.
13. Practice singing Christmas Carols.
14. Wrap up warm and take a hot picnic to Kew Gardens. Remember bread for the ducks!
15. Escape to the country...
16. Bake and decorate sugar cookies to hang on the tree.
17. Make hot cocoa and roasted chestnuts and read stories by the fire.
18. Make Christmas spice cupcakes to take to school for the Christmas Party.
19. Appointment with Father Christmas!
20. Make Christmas Crackers.
21. Read stories about the baby Jesus.
22. Go to St Paul's Cathedral to listen to the choir.
23. Make a wish...
24. Hang out stockings for Father Christmas (don't forget to leave the reindeer a treat!).


For the little cards I just got a piece of thick brown paper and stamped it with white snowflakes using the butt of a butternut squash and a snowflake shaped cookie cutter. Once it had dried I cut the paper up into 24 little cards and wrote each activity over the top.


PS. Last year I found the following image on Pinterest... It seems someone had the genius idea of setting up a "Santa writes back" studio - I had every intention of doing this last Christmas but never got around to it. That and I don't think my boy really and actually understood, not like he does this year! So I have no idea if it's still happening or if they'll reply overseas, but I'm going to give it a go, and here are the details if you want to write to Santa too!


Sunday, 16 September 2012

Looking back

As the last few days of an Indian Summer come and go, I'm fondly looking back on the season just gone before I pack my espadrilles away until next year...


Scilly sunset.


Yet another Bucket Hat made from Liesl Gibson's Little Things To Sew, this time in khaki dino print cotton (recognise this fabric from Karen's skirt?) with a vintage lightning sew-on badge.

Sandy and sparkly, sweet little feet.

Mexican daisies.


Decorating the pavement outside our house with chalks.

Cutting the most delicious bronze Chanel-esque tweed, getting ready for an AutumnWinter photoshoot in the middle of August!

An unforgettable evening spent with Leonard Cohen. Front row, no less.

Winding down the Summer at the local fair.


Time to light a fire, methinks. And finally get around to knitting that last sleeve on my jumper from last year.

Sunday, 19 August 2012

On a day like today

With the inconsistency synonymous with the Summer Holidays, and with the whirlwind of work getting done in these parts as I prepare to launch a brand new line of sewing patterns,  I wanted to introduce a new regular feature on this my personal blog, and at the same time re-evaluate what I want this space to represent for me. Keeping most of my fashion related DIY projects for the By Hand Blog, Stitch me Softly will be a place for me to focus on my personal makes, share knitting & crochet patterns, recipes and home DIY's, and the bits in between that most make me happy.

On a day like today will allow me to slow down, reflecting upon and savouring those fleeting 'little things' in my life responsible for reiterating the wonder I feel (almost!) every day. 


Secretly my favourite kind of day: warm and blustery, patchy cloud and intermittent showers... 


Picking the first of the blackberries in the garden - the ones within reach at least - of which only half (if that!) make it past my boy's sneaky fingers and into the kitchen...


...Where they are gently heated them up with a splash of water and a squeeze of agave nectar, and drizzled over a chocolate cupcake... 

Later that evening, whilst watching The Land Before Time, my son looked at me and said, "I love it me and you".


Saturday, 21 July 2012

Experiments with fabric paints - Part I: Batman and me


Never mind the current cinematic love affair with superheroes, life with an almost four year old boy means that a good 60% of my brain activity is focused on 'Supes. OK, who am I kidding... Having an almost four year old boy gives me the perfect excuse to be into superheroes, when it was probably me who instigated his obsession in the first place! Superheroes are cool, and that's just the bottom line.

Only a matter of time then before superheroes and sewing started to occupy the same space in my brain...


These days I've been having the most amount of fun playing around with fabric paints since having been sent a bunch by the lovely folks over at Bamber Sew for me to try out. Infinite possibilities, my friends, inspiration overload... Expect a flurry of fabric paint related posts and tutorials here and over at the By Hand Blog over the next couple of weeks.

Being non-toxic and only permanent once ironed, the opaque fabric paints are perfect for young kids to begin experimenting with textiles. When my son saw me stencilling a fluorescent Aztec design onto some scrap fabric the other day, he immediately wanted a go. Instead of just giving him some paint, a paintbrush and some fabric, which would have surely resulted in mess and him getting bored after five minutes, I wanted to give him the tools to be able to create something he'd thought through himself, something he'd be proud of, that he could wear right away. Getting flashbacks of nursery school Arts & Crafts, I got out a potato and asked the boy what image he'd most like to cover his t-shirt in. His response: Batman! But of course.


I must admit, carving the batmotif out of that little potato was a lot more challenging than the standard squares and triangles we used to potato-print at school, but not impossible. With a sharp pencil I outlined the image into the flesh of a potato cut in half, then went over the line with a scalpel (Stanley knife would also do). Still using the scalpel, I carefully sliced away the potato's edge, revealing the batmotif in relief.


We had such fun doing this together and best of all my little boy was able to take complete control of his project. Nothing quite like seeing his sweet little face full of concentration and satisfaction as he made his dream t-shirt a reality! In fact, I'm almost tempted to let him loose on some white cotton and use it to make me a dress with what he comes up with!


Sunday, 8 July 2012

Tell me about it... Stud!

As well as all the pattern cutting and sample making going on in my studio, these days over at By Hand HQ we've been having a lot of fun with quick DIY projects. As much as I love the complete process of designing, cutting and making a dress from start to finish, it's so great to be able to break up the concentration with a bit of instant gratification. My little boy is now three and a half and very curious about what his Mama does. He'll often grab some yarn and needles and attempt to knit some socks, order me to make him superhero suits and dinosaur costumes or suggest I make a new dress to wear today, but is always frustrated by how long these things actually take! With all this quickie DIY stuff going on now however, he's found his niche. And my skull studs.

I am proud to say that this project was entirely his idea, he chose his studs and positioned them himself (obviously I did the anchoring of the spiky bits that hold them in place, and demolished my fingers in the process).

It seems the apple really doesn't fall far from the tree. I am overcome with pride. They are the coolest shoes I think I have ever seen. In fact I might have to copy him and make a matching pair for myself. Too much??

What he wore: raglan t-shirt; grey moleskin trousers; his studded plimsoles; 1984 Fisher Price roller skates


Monday, 13 February 2012

Batman & Catwoman


My latest knits could not have been more perfectly timed.  As I sat knitting by a roaring fire, sipping a glass of 1934 Armagnac, eating Narnia-worthy turkish delight and merrily discussing Quantum Mechanics, this year's first snowflakes began to fall.


By morning, the snow had settled, the ponds were frozen and my little caped crusader and I each had a new masked Superhero Hat.


The design was inspired by this Catwoman Hat I had recently seen on Pinterest, and with its ingeniously simple construction, it was a dream to knit.  A fast and seamless knit on circular needles, and using less than a skein of Rowan's Big Wool for each hat, I know this will be something I will make over and over again. In fact, if you know me, let me know if you don't want one of these for your next birthday!


Tuesday, 31 January 2012

Eggy-Bear Bake


These days I'm finding myself increasingly traumatised by the words, "Can I have a sna-ack?".  But one snack is never enough.  Especially on cold January evenings after an action-packed afternoon at nursery. 

"Can I have another snacky-wacky-woo???"

I'm all for a bit of snacking, but as a mother, my main concern is that after 3 rice cakes with honey, a snack bar, half an apple and God-knows-what-else, he won't eat his dinner.  

Enter the bear shaped baking mould.  Instead of snacking, I entice him with the promise of cracking eggs and a bear shaped dinner.  It's pretty exciting.  And as long as I get the butternut squash in the oven to roast and the mushrooms sautéeing the second we get in from school - while he has his perfectly acceptable snack #1 - getting him to crack eggs into the moulds and spoon over the vegetables and watch them bake (for 7-10 minutes), manages to hold his attention long enough to put off his asking for another snack before dinner is ready.


And he thinks that eating an eggy teddy is pretty funny too.

Monday, 30 January 2012

Toddler Tutu


This pretty little tutu skirt is fast becoming a favourite make for friends with little girls (I love sewing for little girls; boys are so unappreciative of Mama-makes!).  This latest tutu was made for possibly the most adorable little girl I know, Lula-Rose, who celebrated her second birthday this weekend.


So simple and satisfying to make and easily grade-able for any size (of course I'm wondering... Could I get away with it???), so I reckon I might have to put together a little tutorial... at some point... but don't hold your breath.  Things are getting busier over here.

Sunday, 18 December 2011

Dino Crayons

So much going on yet such scarce blog activity.  I blame it on Time, or the lack thereof...  But between pre-Christmas festivities, frantic present making, even more frantic workings on The Project That Shall Remain Unnamed (for now), a new puppy, an infinite pile of logs to split... and of course a child to feed and entertain and a house to pretend to clean... I give you Dino Crayons.


So quick and easy: preheat oven to 200 degrees -- gather all those broken bits of wax crayons lying around (or buy a bunch and break them up) -- place broken bits into a silicone mould tray of your choice -- bake until the wax melts, about 10 mins -- leave to cool and set thoroughly before popping out your crayon shapes.


These dinos will be setting up camp in my son's Christmas Stocking, and if I didn't have more than enough to be getting on with, I might think about making up a few more batches to play around with shapes and creating marbled effects by mixing colours...maybe even adding glitter...

Tuesday, 29 November 2011

Let The Countdown Begin...

Season-wise, right now I'm in a state of bliss.


Waking up to frosty foggy mornings; listening sleepily as my 3 year old recalls his monster-bashing dreams over a bowl of hot, maple syrupy porridge; crunching our way to the park through fallen leaves;  the anticipation building as Christmas comes into view...

It certainly has been an eventful Autumn for me.  Events that shall not be named - certain exciting new business events that remain a secret, and certain difficult personal events that have thankfully now been resolved - combined with all the love and joy (and a little exhaustion...!) of raising a very spirited boy have made for a more emotionally concentrated few months than usual, with circumstantial highs and lows fighting to dominate my mood.  But despite the testing moments, it seems that life's little pleasures always win.  And I have been moved to be able to enjoy those little pleasures that have always pleased me so much, but now with my not-so-baby boy, who, for the first time, is really taking notice.

As we move into wintry territory, and what feels like a new chapter in my life, I find myself filled with hope, excited not only for the coming month, but for the coming future. And in the meantime, I am trying to remain mindful of right now.  Always looking forward, but remembering to slow down and squeeze every last drop out of the build-up.  Like most things, the time spent leading up to the climax is what should be savoured most of all...!

So, in order to squeeze every last drop out of the Festive Season, I made an Avent Calendar using an(other!) old frame and pockets to be filled with ideas, plans, reminders, the odd treat - anything and everything to inspire us to make each day leading up to Christmas count.

~ Advent Calendar ~


I started by rummaging through my scraps of felt to combine with a completely adorable Japanese cotton from The Eternal Maker, and made 24 pockets (10 x 12 ish cm) with a tunnel loop across the top so they could be strung and hung across my frame using the same method from my last frame repurpose.


Planning the layout before embroidering and appliquéing the numbers... To be honest, I found this part pretty tedious.  While I love the idea of embroidery, I simply don't have the patience.  Sort of how I feel about knitting with ultra fine yarn... Hopefully one day I'll have more time for endlessly intricate projects!


Definitely worth it though, and now the fun part: filling each pocket with notes, things to do on each day, a wishbone I saved from the last roast, a lucky penny for his money box, odd treats and trinkets... you get the idea.  


P.S. My apologies for dingy shots, to be blamed entirely on dingy weather!

Friday, 11 November 2011

Repurposing A Frame


from this...

...to this ~


For a while now I've been wanting to figure out a decent display solution for all the cards that seem to be accumulating on my fridge and the increasing number of masterpieces my son is churning out these days... But I've been feeling a bit let down by Blu Tack lately - not only is it eating away at my walls but it seems to be a lot less sticky than it was back in the days of heart-throb posters... 

So I found a big wooden 2nd hand frame, removed the dodgy watercolour, glass and back board and repositioned the hooks to make it hang portrait...


...then marked out 7" intervals on either side of the frame where I wanted to place the strings for hanging stuff from...


...pushed, but not all the way, drawing pins (thumb tacks if you're Stateside) into the marked intervals...


...and finally, tightly knotted some strong cotton twine across the frame, held in place by the two corresponding drawing pins on either side, hammered the drawing pins securely down and snipped off the excess string.


And after a 10 minute fixer-upper project I now have the perfect little gallery for my son's works of art,  the ideal place to display on rotation all the cards that ever meant something, tickets to a certain upcoming Gillian Welch gig, and I'm sure the odd shopping list will find it's way there soon.

Friday, 7 October 2011

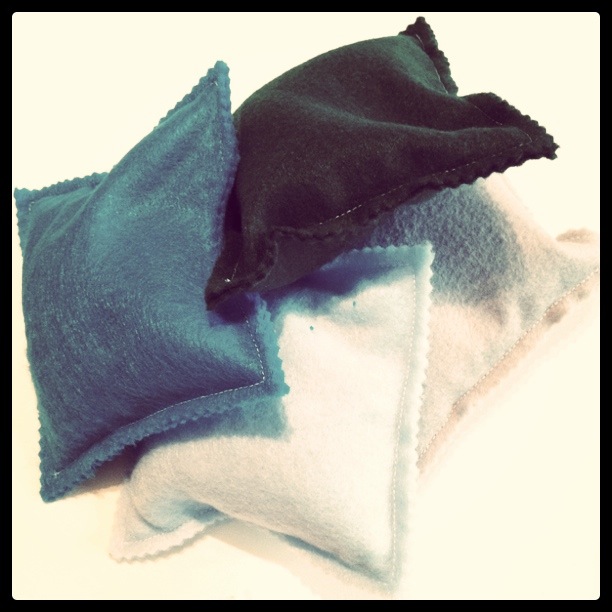
Beanbags - a quick tutorial


With the mornings getting a notch frostier every day, I think our days of kicking a football around the garden this year are numbered.  And while I'm overflowing with cosy, crafty indoor activity ideas for the colder months, my three year old boy still has enough energy to fuel a small tractor - and no amount of cutting and sticking and baking and story reading will sufficiently exert that energy.  I draw the line at the football in the house so I thought that soft, unbouncy beanbags would be just the thing to throw around without causing too much havoc, improve my toddler's hand-eye coordination, and most importantly, wear him out!

This is such a quick project, taking only about half an hour, and the child in your life will love being entrusted with the most important job - pouring in the beans!


You Will Need:
4 x A4 sheets of felt in different colours (or enough felt/thick cotton to cut 8 x 15cm squares)
a rotary cutter or scissors
a ruler
dried beans
pinking shears


Measure and cut out 8 squares 15 x 15cm, 2 of each colour (or you could contrast the front and back).


Using a short stitch, join 2 squares together by stitching 15mm from the edges, remembering to leave an opening big enough to pour in the beans.


Get your helper to spoon in the dried beans through the opening until you have a full and squishy (but not bursting) pouch.

Stitch the opening closed, and trim off the excess edges with pinking shears.


Related Posts Plugin for WordPress, Blogger...