Showing posts with label recipe. Show all posts

Thursday, 28 June 2012

Smells like Home

I don't know why the smell of a freshly baked loaf of bread feels like home to me... If my memory serves me well (and I have an excellent memory by the way, I have even been referred to as "the elephant who never forgets"), there wasn't a whole lot of bread-baking going at home when I was little. Brown rice and lentils, yes, but bread, no (sorry Mum!). But it is undeniable - a slice of homemade bread, still warm from the oven, butter melting, a pinch of salt, that wholesome aroma finding its way around the house = Home. Maybe it's some kind of evolutionary inherited memory... Bread = we're not going to starve. We're safe. We're content.


What follows is the recipe for the absolute basic, no frills, bog standard, goes with everything kind of wholemeal bread. Simple and delicious.

Ingredients:

  • 600g strong wholemeal bread flour, plus extra for dusting
  • 2 tsp dried yeast
  • 2 tsp salt
  • 2 tsp brown sugar
  • 400ml warm water
  • 1 tbsp olive oil

Method:

Preheat oven to its lowest setting.
Put the flour into a large mixing bowl and into the oven to warm for 10 mins.
Meanwhile, boil the kettle and measure out the 400ml water, add the oil and put aside to warm down/get less boiling!
Add the remaining dry ingredients to the warm flour and mix well.
Make a well in the flour mix and slowly pour in the warm oily water, mixing as you go to form a dough.
The dough should be firm and holding itself together - if it feels too wet and sticky add a little flour; if it feels too dry and crumbly, add a little more water.
Turn the dough out to a clean surface dusted with flour. Give your hands a little dusting too. Now start kneading your dough. Knead firmly for a good 5 mins or so, adding a little extra flour if it starts to feel sticky. You want to achieve a smoothish, elastic consistency that bounces back into shape when pinched.
Dust the bowl with a little flour and put your ball of dough back in. Cover with a tea towel or clingfilm and leave to rise in a warm spot. The dough needs to pretty much double in size, which should take about half an hour.


When the dough has risen, turn it back out onto the floured surface and quickly punch out the air. You don't need to knead it again this time.
Place the dough on an oiled baking sheet or into an oiled bread tin. Cover and leave to rise one last time, again for about half an hour.
Preheat the oven to 200 degrees.
When the dough is done rising, put it straight into the hot oven and bake for 30 mins. When it's done, it should have a nice and crisp crust, and make a hollow sound when you tap the bottom.
If you baked your bread in a tin, when it's ready take it ouf the tin and put back in the oven upside down for 5 mins to crisp up the bottom and sides.

~ Now this is the important bit - eat while it is still warm!

Sunday, 4 March 2012

Recipe Revealed ~ The Most Delicious Dairy-Free Chocolate Cupcakes I've Ever Eaten

So I promised you the recipe for my insanely deliciously dense chocolate cupcakes (no dairy!)... Here it is. Get ready.


~ Chocolate Cupcakes (dairy-free) ~

50g self-raising flour
50g ground almonds
30g cocoa powder
140g golden caster sugar
a pinch of salt
1 egg
200ml coconut milk (half a can)
1/2 tsp vanilla essence

For the frosting:


or

300g icing sugar, sifted
100g dairy-free spread/goats butter
40g cocoa powder, sifted
40ml rice milk


Preheat oven to 180 degrees.  Line a cupcake tray and set aside.
In a bowl, sift together all dry ingredients and mix well.
In another bowl, combine wet ingredients.
Slowly add wet bowl to dry bowl and mix well until fully incorporated.
Spoon mixture into the cupcake cases and bake for 15-20 mins (I like mine to have a bit of a gooey fondant-esque centre so I take them out after 15 mins.  If you like yours well done, bake for 20 mins, or until a skewer inserted comes out clean).


A few words on frosting:  Dairy-free frosting can be tricky.  If you are substituting butter for a dairy-free alternative (which tend to have more of a soft margarine-like consistency) it can be much harder to achieve a firm frosting that keeps its shape once piped.  Make sure you refrigerate the frosting for a good hour or two before attempting to pipe, or alternatively, simply slather it on, Hummingbird Bakery style.  If you're using goats butter, the consistency will be fine, as if you were using regular butter, but watch out for a very subtle goaty kick!  I personally don't mind this, and if you're the kind of person who likes cream cheese frosting, you probably won't even notice.  Another option for frosting, my current favourite in fact, has a whipped coconut milk base (see above link for recipe).  You'll need to have a bit of foresight for this though as the opened, unshaken can of coconut milk needs to be in the fridge overnight to get sufficiently firm.  No impromptu cupcake baking with this method I'm afraid.


So there you have it my friends.  My secret recipe is out.  Spread the love.  Sharing is caring.  And above all, enjoy!


Tuesday, 31 January 2012

Eggy-Bear Bake


These days I'm finding myself increasingly traumatised by the words, "Can I have a sna-ack?".  But one snack is never enough.  Especially on cold January evenings after an action-packed afternoon at nursery. 

"Can I have another snacky-wacky-woo???"

I'm all for a bit of snacking, but as a mother, my main concern is that after 3 rice cakes with honey, a snack bar, half an apple and God-knows-what-else, he won't eat his dinner.  

Enter the bear shaped baking mould.  Instead of snacking, I entice him with the promise of cracking eggs and a bear shaped dinner.  It's pretty exciting.  And as long as I get the butternut squash in the oven to roast and the mushrooms sautéeing the second we get in from school - while he has his perfectly acceptable snack #1 - getting him to crack eggs into the moulds and spoon over the vegetables and watch them bake (for 7-10 minutes), manages to hold his attention long enough to put off his asking for another snack before dinner is ready.


And he thinks that eating an eggy teddy is pretty funny too.

Tuesday, 10 January 2012

Actually Really Healthy Cupcakes

While most of us girls begin a new year with ambitious goals of health and fitness, all those Christmas feasts usually equal a stretched out stomach that insatiably screams to be fed for weeks after, making it very hard to curb the apetite... That, and certain Bourbon Custard recipes popping up on my reader...

And so it was on this grey afternoon, unable to shake that permanently peckish feeling, I gave in and made a batch of cupcakes.  However, having just seen a pretty healthy recipe over at Jennifer Casa's blog I was determined satisfy my cravings and do my body a favour at the same time.


Using Jennifer's recipe as a vague guide (omitting the yoghurt as my son is allergic to dairy), I came up with the following recipe which is not only delicious but really is packed with super healthy ingredients and not a gram of crap.  As most of the ingredients are wet, I have done the measurements in cups as opposed to weight.

~ Peanut Butter Cacao Cupcakes ~

1 egg
1/3 cup manuka honey (ultra antibacterial and immune system boosting)
1/3 cup agave nectar (honey-like syrup, very low GI, even ok for diabetics)
1/3 cup rapeseed oil
1/2 tsp vanilla extract
1 cup self raising flour
1/3 cup crunchy peanut butter or almond butter even better
2 tbsp ground flax
1/3 cup raw cacao nibs (insane health benefits)

Preheat oven to 180 degrees.
Mix all wet ingredients in a bowl.
Sift in flour and incorporate.  
Mix in the peanut/almond butter, flax and cacao.
Spoon the mixture into 12 cupcake cases and bake for 15 mins.
Eat while still warm... and don't feel too bad about having another!


Tuesday, 1 November 2011

Limoncello

Those of you who know me, will have noticed a little penchant I've developed over the last year or so for making fruit infused vodka.  So far I've dabbled in blueberry, blackberry, raspberryfragola grape and tonight, lemon.  Being half-Italian I figured it would be outrageous for me not to give this traditional Italian digestivo a go, even if I do prefer the sweeter end of the liquor spectrum... Maybe I'll just up the sugar a smidge.


Limoncello

the rind of 5 lemons, none of the white pith though
1 litre of vodka, or 98% proof alcohol is better (hic) if you can find it
1kg sugar
750ml water

Place the lemon rinds (and a little bit of the juice) in a sterilised sealable container and pour over the vodka.
Seal and keep for a week in a darkish, dry place, giving it a shake every day.

~

Bring the water to the boil and add the sugar, stirring until it has dissolved.
pour in the vodka and rinds, stir, and return to the container (or a bigger one if need be).
Keep it infusing for at least another week, shaking every now and then - I'll be leaving mine until Christmas - then strain into a bottle and serve chilled.

And if anyone was wondering about that Raspberry Vodka I made back in June, I'm afraid it's getting drunk faster than I can photograph it/write about it.  But it was very good.

what's left of my blueberry vodka (left) and raspberry vodka (right)

Monday, 26 September 2011

Practice Makes...

...almost perfect.


Due to my son's intolerance to dairy products, I am always trying to find the perfect substitute for butter in my baking.  Not the easiest task.  It's true what they say: it really is better with butter.  Dairy-free and soya spreads are ok for cakes and muffins, but I'm always a little put off by the almost curdled consistency you get when you beat in the eggs.  Having said that, I find the cooked confection to be fine consistency-wise, and passable taste-wise.  But when baking biscuits or pastry, soft spreads should be avoided like the plague - the dough is always too soft and greasy, and the biscuits are never firm and crunchy.  

Then recently I had a flash of inspiration while buying my son's favourite goat's yoghurts pots.  Goat's butter, of course!  Just as hard and firm as a cold slab of cow's butter, and still essentially, well, butter.

So to test it out, and practice for Halloween, I came up with a twist on a classic gingerbread biscuit...

~ Ginger & Chocolate Biscuits ~
yield: 45-50 biscuits

350g plain flour (+ extra for dusting)
50g cocoa
1 tsp bicarbonate of soda
1 tsp ground cinnamon
2 tsp ground ginger
110g goat's butter
70g golden castor sugar
1 egg
3 tbsp rice syrup/golden syrup
icing sugar for dusting


Preheat the oven to 170 degrees.  Lightly dust a baking sheet with flour.
In a bowl, sift and combine the flour, cocoa, bicarb, cinnamon and ginger.
In the bowl of an electric mixer, cream the butter and sugar until fluffy.
Increase the speed of the mixer and beat in the egg and syrup.
Put the mixer on low speed and slowly add in the flour mix until you get a nice, firm dough.
Dust a clean surface and a rolling pin with flour and roll out your dough to about half a cm thick.
Using a cookie cutter, cut out your shapes and transfer to the baking sheet, leaving a little space between each biscuit.


Tip: to avoid breaking the delicate dough as you peel it off your surface, dip a palette knife in some flour and see how easy it is to transfer the biscuits to the baking sheet!

Bake for 8-10 mins and leave to cool completely on a wire rack.
Once cool, dust lightly with icing sugar.


The goat's butter proved to be a huge success.  The biscuits were perfectly biscuity and not a hint of goatiness, which I was a bit worried about.  Delicious.  However, there's always room for a little improvement so next time I might substitute the ground ginger for freshly grated ginger, and find a way to get some melted dark chocolate in there too... Just to really get the most out of the flavours.

Tuesday, 6 September 2011

Jammy Almond Muffins on a Sunday Afternoon


After a massively salty Sunday lunch of gammon and roast potatoes, we were all left craving something sweet.  Not wanting to go down the heavy road of chocolate or frosting, I came up with a recipe that I think perfectly bridges the gap between fruity, light(ish) Summer baking and richer, Autumnal comfort cakes.  

~ Jammy Almond Muffins ~

110g butter or dairy-free spread
110g golden caster sugar
2 eggs
1/2 tsp almond extract
40g plain flour
100g ground almonds
1 tsp baking powder
1 tsp bicarbonate of soda
1 generous tbsp plum jam (raspberry or apricot would work too)
flaked almonds for sprinkling

Preheat the oven to 180 degrees.  Line a muffin tray with 9 muffin cases.
In the bowl of an electric mixer with paddle attachment, cream together the butter and sugar.
Slowly add in the eggs and almond extract.
Mix in all dry ingredients.
Mix in the jam, and spoon the mixture into the muffin cases.  Sprinkle a few almond flakes over each muffin.
Bake for about 15 mins, or until a skewer inserted comes out clean.  Cool on a wire rack.

Monday, 22 August 2011

Plum Yum Jam


I'm slightly ashamed to admit that this was my first ever attempt at making jam... What stopped me before??  After talking to my Mum and Step-Mum, and looking over various jam-making methods online, I did it like this... and it came out pretty damn good, if I do say so myself.  Must be Beginner's Luck.

~ Plum Jam Recipe ~

2 kgs whole plums, washed
1 pint water
a squeeze of lemon
1.5 kgs golden granulated sugar
3 clean jam jars

To begin with, put a little plate in the fridge.  This will come into play when the jam's about done, to see if it's set.

In a big pot combine plums, water and lemon and simmer gently over a low heat.

Meanwhile, place the clean jars (no lid) on a plate in a cold over and turn on to 160 degrees to sterilise them.  To sterilise the lids, place in a small pot covered with water and boil for 5 mins.

Put the sugar in the warm oven for 10 mins.

By now the plums will be softening and once the skins have started splitting, add the warm sugar and stir, still over a low heat, until the sugar has completely dissolved.


Turn the heat up to max and keep on a rolling boil, stirring occasionally and removing stones, for about 10-20 mins.  After 10 mins, you need to start checking if the jam has set... Take the cold plate out of the fridge and drizzle on a little of your hot jam.  Put it back in the fridge for 2 mins, and if when it comes out, it is feeling gloopy and gooey when you run your finger through it, it's done.  If not, keep boiling and cold plate testing every 5 mins.

When it's ready, skim the foam off the top of the jam, take the jars out of the oven, carefully spoon the jam into the jars and screw the lids back on tightly.

Done.  Leave to cool before eating, and store in a cool, dry place.

oh hell yeah

Wednesday, 17 August 2011

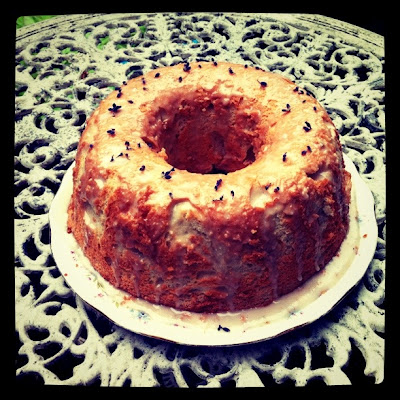
Lavender Angel's Food Cake ~ Recipe


This was my first time baking with lavender, and also my first time baking Angel's Food Cake, so I was a little unsure as to how it would turn out, especially being a relatively improvised recipe.  The result, however, was divine... so deliciously light, and airy, and fragrant, and summery... 

~ Lavender Angel's Food Cake ~

for the cake:
140g plain flour
12 egg whites
1 tbsp warm lavender water (see below)
1/2 tsp salt
1 tsp cream of tartar
300g caster sugar
1 tsp vanilla essence
a 25cm ring shaped cake tin, ungreased

for the lavender glaze:
icing sugar
lavender water

for the lavender water:
fill a ramekin with lavender flowers, then add boiling water and allow to steep for an hour or two.

ramekin with lavender flowers steeping in boiling water

Preheat the oven to 180 degrees.
Sift the flour four times, set aside.
Using an electric whisk, beat the egg whites and warm lavender water on a low speed until foamy.
Add in the salt and cream of tartar and increase the speed until you get soft peaks.
Add in the sugar gradually and continue to beat until your mixture is stiff and glossy.
Beat in the vanilla essence.
Using a metal spoon, gently but thoroughly fold in the sifted flour.
Spoon the mixture into the ungreased cake ring, there should be enough to completely fill the tin.
Bake for 35-40 mins, or until a skewer inserted comes out clean.
Now the cake needs to cool for about an hour... upside down. Invert the cake tin over the neck of a bottle.  Don't worry, the cake won't fall out, this is so the cake can cool without sinking down and losing its airy-ness.

my ring tin didn't actually have a hole all the way through, so here it is, balancing quite precariously on the top of a bottle...

Now when the cake has cooled, loosen the sides by running a knife inside the edges and invert onto a wire rack.  It doesn't come out so easily so you need to gently ease it out of the tin without breaking the sponge.

To make the lavender glaze, simply add the rest of the lavender water from the ramekin into a mixing bowl, and slowly go sifting some icing sugar in and mixing until you get a drizzlable glazey consistency.
Drizzle over the top of the cake, and finish by scattering some lavender over the top.


Tuesday, 16 August 2011

Playdough!

Summer holidays in the city with kids.  Unless you're prepared to spend a small fortune on so-called family days out (100 quid family outing to the zoo* anyone?), there's only so much time you can spend at the park.  And when it rains, which in London it does a lot, what then?  Trying my best to keep to a one-dvd-a-day limit, and keeping unnecessary spending to a minimum, these days my brain has been working overtime thinking up fun, free and stimulating things to do with my incredibly active almost three-year-old son.  Today: making playdough.  


All kids, toddler aged and up, will love pouring out the ingredients, choosing the colours, mixing it all up, adding glitter, marbling two or more colours together... and that's just the making part.


Inspired by a conversation I recently had with a close friend (and very creative mother of two), I really think the key when planning kids' activities is to have more than one part to the process.  For example, you spend one afternoon in the park/garden/heath picking blackberries (in season now).  Some you eat there and then - a fresh pudding for your picnic, some you take home.  The next morning you spend making something with the berries you brought home - a pie, lollies, jam, anything simple that kids can help with.  And finally you get to enjoy what you made altogether.  With older kids you could even set up a little stall for them to sell the jam/pie to passers by.

Not only does staggering an activity prolong the fun, but simple step-by-step projects like this will instill a sense of process and continuity, will teach children about seeing something through from start to finish, and of course, will stimulate their creativity and increase their skill and capability, as opposed to simply playing with something that is put in front of them (and inevitably getting bored or frustrated pretty quickly).

~ Playdough Recipe (no cooking required) ~

1/2 cup plain flour
1/4 cup salt
1/2 tbsp cream of tartare
1/2 tbsp vegetable oil
1/2 cup boiling water
a generous splash of food colouring
Optional: a few drops of essential oil, glitter

In a bowl combine dry ingredients and oil.  Add the boiling water, food colouring and essential oil and mix thoroughly.  It will feel very pasty to begin with but keep mixing and it will quickly turn doughy as it cools.  Store in tupperware or sealable sandwich bags.  This recipe is enough for one little batch weighing about 300g.  I made three batches - one red, one green and one blue (with gold glitter!).

the mixture at first, soft and pasty

the finished dough

* Free alternative to an afternoon at the zoo?  Take the kids to a pet shop and as long as you don't mind pretending to the staff that you are seriously in the market for a new puppy/kitten/iguana, you will be able to pet and cuddle baby animals to your heart's content.

Thursday, 30 June 2011

Raspberry Vodka

After a deliciously long weekend in the country, it was hard not to feel slightly deflated driving back to a drizzly, grizzly city.  But instead of moaning, I am taking pleasure in what we brought back... a small collection of thrifted charity shop treasures and a big batch of raspberries freshly picked this morning.

~ Raspberry Vodka ~

approx 350g fresh raspberries
75-150g golden caster sugar (depending on how sweet you like it - I like mine a little tart)
70cl Vodka (some say the cheaper the better)
an air-tight jar, very clean


Place the raspberries in the jar, add the sugar and pour over the vodka.  Close the jar and give it a really good and vigorous shake.  For the first month, you need to shake it up as often as you remember - every day if possible.  For the following couple of months just give it a shake every week or other week.  Keep it at room temperature and away from direct sunlight; I keep mine in plain view on the kitchen counter so I don't forget to shake it!  Leave your vodka to infuse for at least two months, three if you can wait.  When the time comes, you will need a clean bottle, a funnel and a sieve (or clean muslin cloth) to separate the liquid from the berries.  Your raspberry vodka is now ready to drink.  But don't throw away the boozy berries - they are delicious slightly warmed and eaten with ice cream for example, or baked in a cake, or punch...  I'm looking forward to Autumn already.

Thursday, 9 June 2011

Sweet Cherry Pie


My fingers are by no means green.  I can't even keep a pot of basil alive.  But I love my Cherry Tree.  I really love it, and I think that's why it has not only survived since I planted it last Spring, but has really bloomed.


Sweet Cherry Pie ~ dairy free

For the Pastry:
250g plain flour
75g caster sugar
110g dairy free spread
50ml cold water

Combine the flour, sugar and spread until the mixture resembles breadcrumbs.
Add the water and using a butter knife bring it all together until you get a golden dough.
At this point, I judge by eye whether or not the dough is too sticky and therefore needs a little more flour, or too dry and therefore needs a little more water.
Wrap your dough (not too sticky, not too dry) in clingfilm and refrigerate for at least half an hour.

For the Filling:
275g cherries, cut in half and stoned
2 bananas, chopped
3 tbsp caster sugar
100ml water

Combine all ingredients in a pan and bring to the boil.
Cover with a lid, turn the heat down and simmer for about 15-20 mins, or until the bananas have gone gloopy.
Leave to cool.

Preheat oven to 200 degrees.
Break off about a third of the pastry and put to one side.
Roll out your 2/3 of pastry and use it to line an ovenproof dish, pricking the bottom a few times with a fork.
Bake for 15 mins.  Meanwhile, roll out the remaining third of pastry - this is the pie's lid, so feel free to decorate as you wish, just be sure to include a few pricks in the decoration to allow air to circulate while it bakes.
Fill the pastry-lined dish with the cherry and banana filling, and carefully put the lid over the top, gently sealing the edges.
Bake for a further 20 mins.
Allow the pie to cool a little before serving with vanilla ice-cream/custard/clotted cream...


Friday, 27 May 2011

Mini Upside-Down Peach Cake


When you love baking, but don't have an army of kids and dogs to feed, things can get a little dangerous... Of course, my one son would be more than happy to inhale an entire cake in an afternoon, but I do feel I have a duty as a parent to restrain his appetite for sugar.  So I end up doing what any loving, responsible mother would do: I cut him a slice, then eat the rest myself.  Like I said, this can get very dangerous.


So this morning at breakfast while I was flicking through my favourite cake book, Cakes To Celebrate Love and Life, which never fails to inspire me, I had an idea.  I'd make a mini-cake.  Substantial enough in its sliceable cake-ness, but small enough not to feel too guilty when you gobble it all up in the name of maternal self-sacrifice.


Mini Upside-Down Peach Cake (dairy free)

3 ripe peaches or nectarines, peeled and sliced
125g plain four
200g golden granulated sugar
1 tsp baking powder
1 tsp bicarbonate of soda
a pinch of salt
1 lemon, zest and juice
1 egg
75ml vegetable oil
75ml rice milk

Preheat oven to 180 degrees.
Line a 20cm cake tin with greaseproof paper and arrange peach slices in the bottom.
In the bowl of an electric mixer, combine all dry ingredients (flour, sugar, baking powder, bicarb, salt, zest).
In a separate bowl, or the measuring jug used for the oil and milk, combine all wet ingredients (lemon juice, egg, oil, milk) and mix well.
Add wet mixture slowly to dry mixture and mix on a medium speed until fully incorporated.
Pour this batter over the peach slices and bake for 45 mins, or until an inserted skewer comes out cleanish (bear in mind this is quite a moist cake).
Leave to cool in the tin for 5 mins, then turn out onto a plate (peaches slices now facing up) and leave to cool further on a cooling rack.
Be careful when removing the greaseproof paper.


PS. This recipe was self-invented and does not come from the book I mentioned.


Related Posts Plugin for WordPress, Blogger...