Showing posts with label dairy-free. Show all posts

Tuesday, 10 January 2012

Actually Really Healthy Cupcakes

While most of us girls begin a new year with ambitious goals of health and fitness, all those Christmas feasts usually equal a stretched out stomach that insatiably screams to be fed for weeks after, making it very hard to curb the apetite... That, and certain Bourbon Custard recipes popping up on my reader...

And so it was on this grey afternoon, unable to shake that permanently peckish feeling, I gave in and made a batch of cupcakes.  However, having just seen a pretty healthy recipe over at Jennifer Casa's blog I was determined satisfy my cravings and do my body a favour at the same time.


Using Jennifer's recipe as a vague guide (omitting the yoghurt as my son is allergic to dairy), I came up with the following recipe which is not only delicious but really is packed with super healthy ingredients and not a gram of crap.  As most of the ingredients are wet, I have done the measurements in cups as opposed to weight.

~ Peanut Butter Cacao Cupcakes ~

1 egg
1/3 cup manuka honey (ultra antibacterial and immune system boosting)
1/3 cup agave nectar (honey-like syrup, very low GI, even ok for diabetics)
1/3 cup rapeseed oil
1/2 tsp vanilla extract
1 cup self raising flour
1/3 cup crunchy peanut butter or almond butter even better
2 tbsp ground flax
1/3 cup raw cacao nibs (insane health benefits)

Preheat oven to 180 degrees.
Mix all wet ingredients in a bowl.
Sift in flour and incorporate.  
Mix in the peanut/almond butter, flax and cacao.
Spoon the mixture into 12 cupcake cases and bake for 15 mins.
Eat while still warm... and don't feel too bad about having another!


Monday, 26 September 2011

Practice Makes...

...almost perfect.


Due to my son's intolerance to dairy products, I am always trying to find the perfect substitute for butter in my baking.  Not the easiest task.  It's true what they say: it really is better with butter.  Dairy-free and soya spreads are ok for cakes and muffins, but I'm always a little put off by the almost curdled consistency you get when you beat in the eggs.  Having said that, I find the cooked confection to be fine consistency-wise, and passable taste-wise.  But when baking biscuits or pastry, soft spreads should be avoided like the plague - the dough is always too soft and greasy, and the biscuits are never firm and crunchy.  

Then recently I had a flash of inspiration while buying my son's favourite goat's yoghurts pots.  Goat's butter, of course!  Just as hard and firm as a cold slab of cow's butter, and still essentially, well, butter.

So to test it out, and practice for Halloween, I came up with a twist on a classic gingerbread biscuit...

~ Ginger & Chocolate Biscuits ~
yield: 45-50 biscuits

350g plain flour (+ extra for dusting)
50g cocoa
1 tsp bicarbonate of soda
1 tsp ground cinnamon
2 tsp ground ginger
110g goat's butter
70g golden castor sugar
1 egg
3 tbsp rice syrup/golden syrup
icing sugar for dusting


Preheat the oven to 170 degrees.  Lightly dust a baking sheet with flour.
In a bowl, sift and combine the flour, cocoa, bicarb, cinnamon and ginger.
In the bowl of an electric mixer, cream the butter and sugar until fluffy.
Increase the speed of the mixer and beat in the egg and syrup.
Put the mixer on low speed and slowly add in the flour mix until you get a nice, firm dough.
Dust a clean surface and a rolling pin with flour and roll out your dough to about half a cm thick.
Using a cookie cutter, cut out your shapes and transfer to the baking sheet, leaving a little space between each biscuit.


Tip: to avoid breaking the delicate dough as you peel it off your surface, dip a palette knife in some flour and see how easy it is to transfer the biscuits to the baking sheet!

Bake for 8-10 mins and leave to cool completely on a wire rack.
Once cool, dust lightly with icing sugar.


The goat's butter proved to be a huge success.  The biscuits were perfectly biscuity and not a hint of goatiness, which I was a bit worried about.  Delicious.  However, there's always room for a little improvement so next time I might substitute the ground ginger for freshly grated ginger, and find a way to get some melted dark chocolate in there too... Just to really get the most out of the flavours.

Thursday, 15 September 2011

Simple Pleasures

I am a firm believer that it is the simple pleasures, the little joys in life, that make all the difference.  You just have to notice them.  Forget the fleeting rush of a new pair of £700 shoes; the contentment that comes with being able to see the wonder in life's miniest miracles is really the key, I think, to lasting happiness.


Autumn is finally here (which, for me, is a constant source of joy in its own right), and while the days here are still warmish, late nights and early mornings are getting pretty damn chilleh.  Like, not-wanting-to-get-out-of-a-warm-bed-at-seven-in-the-morning kind of chilly.  So if the antidote to cold evenings is sleepy tea and a hottie, the way forward on a frosty morning is a healthy, hearty, warming breakfast to ease you into gear.  So yesterday I made a big batch of granola (I like mine with hot milk...).  At the risk of sounding like a hessian-clad, hairy-legged, free-lovin' hippie... as I mixed up the oats, nuts, flaxseed, wheatgerm, raw cacao, oatbran, etc etc health food shit etc, I felt so completely and blissfully aware of all the nutrition and natural goodness I was packing into my family's breakfast...


And the best part - waking up this morning to my boy saying "Mama wake up!  Let's go have a bowl of that licious ganola you made!"   And the contentment I felt as I sleepily watched him guzzle it up, knowing that no shop-bought granola could ever compare to Mama's Homemade Granola; not in nutritional value nor love content.  I was like, totally blissed out, man.

Tuesday, 6 September 2011

Jammy Almond Muffins on a Sunday Afternoon


After a massively salty Sunday lunch of gammon and roast potatoes, we were all left craving something sweet.  Not wanting to go down the heavy road of chocolate or frosting, I came up with a recipe that I think perfectly bridges the gap between fruity, light(ish) Summer baking and richer, Autumnal comfort cakes.  

~ Jammy Almond Muffins ~

110g butter or dairy-free spread
110g golden caster sugar
2 eggs
1/2 tsp almond extract
40g plain flour
100g ground almonds
1 tsp baking powder
1 tsp bicarbonate of soda
1 generous tbsp plum jam (raspberry or apricot would work too)
flaked almonds for sprinkling

Preheat the oven to 180 degrees.  Line a muffin tray with 9 muffin cases.
In the bowl of an electric mixer with paddle attachment, cream together the butter and sugar.
Slowly add in the eggs and almond extract.
Mix in all dry ingredients.
Mix in the jam, and spoon the mixture into the muffin cases.  Sprinkle a few almond flakes over each muffin.
Bake for about 15 mins, or until a skewer inserted comes out clean.  Cool on a wire rack.

Tuesday, 30 August 2011

Maple... Pecan... Cookies.


Is there anything more delicious than maple syrup? I'd be hard pressed to think of something yummier... And these Maple Pecan Cookies from Xanthe Milton's -aka Cookie Girl- adorable book Eat Me, do not disappoint.  Chewy, just the right amount of crunch, and, mmmm maple syrupy... I might even add an extra tablespoon of syrup next time, or maybe drizzle some over the cookies while they're still warm... My only complaint (of my cookies, not the recipe) is having had to substitute the soft dark sugar (which the recipe called for and I have run out of) for golden caster sugar, resulting in a somewhat albino looking cookie.


Wednesday, 17 August 2011

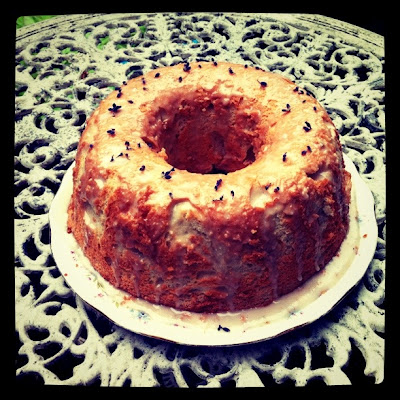
Lavender Angel's Food Cake ~ Recipe


This was my first time baking with lavender, and also my first time baking Angel's Food Cake, so I was a little unsure as to how it would turn out, especially being a relatively improvised recipe.  The result, however, was divine... so deliciously light, and airy, and fragrant, and summery... 

~ Lavender Angel's Food Cake ~

for the cake:
140g plain flour
12 egg whites
1 tbsp warm lavender water (see below)
1/2 tsp salt
1 tsp cream of tartar
300g caster sugar
1 tsp vanilla essence
a 25cm ring shaped cake tin, ungreased

for the lavender glaze:
icing sugar
lavender water

for the lavender water:
fill a ramekin with lavender flowers, then add boiling water and allow to steep for an hour or two.

ramekin with lavender flowers steeping in boiling water

Preheat the oven to 180 degrees.
Sift the flour four times, set aside.
Using an electric whisk, beat the egg whites and warm lavender water on a low speed until foamy.
Add in the salt and cream of tartar and increase the speed until you get soft peaks.
Add in the sugar gradually and continue to beat until your mixture is stiff and glossy.
Beat in the vanilla essence.
Using a metal spoon, gently but thoroughly fold in the sifted flour.
Spoon the mixture into the ungreased cake ring, there should be enough to completely fill the tin.
Bake for 35-40 mins, or until a skewer inserted comes out clean.
Now the cake needs to cool for about an hour... upside down. Invert the cake tin over the neck of a bottle.  Don't worry, the cake won't fall out, this is so the cake can cool without sinking down and losing its airy-ness.

my ring tin didn't actually have a hole all the way through, so here it is, balancing quite precariously on the top of a bottle...

Now when the cake has cooled, loosen the sides by running a knife inside the edges and invert onto a wire rack.  It doesn't come out so easily so you need to gently ease it out of the tin without breaking the sponge.

To make the lavender glaze, simply add the rest of the lavender water from the ramekin into a mixing bowl, and slowly go sifting some icing sugar in and mixing until you get a drizzlable glazey consistency.
Drizzle over the top of the cake, and finish by scattering some lavender over the top.


Thursday, 9 June 2011

Sweet Cherry Pie


My fingers are by no means green.  I can't even keep a pot of basil alive.  But I love my Cherry Tree.  I really love it, and I think that's why it has not only survived since I planted it last Spring, but has really bloomed.


Sweet Cherry Pie ~ dairy free

For the Pastry:
250g plain flour
75g caster sugar
110g dairy free spread
50ml cold water

Combine the flour, sugar and spread until the mixture resembles breadcrumbs.
Add the water and using a butter knife bring it all together until you get a golden dough.
At this point, I judge by eye whether or not the dough is too sticky and therefore needs a little more flour, or too dry and therefore needs a little more water.
Wrap your dough (not too sticky, not too dry) in clingfilm and refrigerate for at least half an hour.

For the Filling:
275g cherries, cut in half and stoned
2 bananas, chopped
3 tbsp caster sugar
100ml water

Combine all ingredients in a pan and bring to the boil.
Cover with a lid, turn the heat down and simmer for about 15-20 mins, or until the bananas have gone gloopy.
Leave to cool.

Preheat oven to 200 degrees.
Break off about a third of the pastry and put to one side.
Roll out your 2/3 of pastry and use it to line an ovenproof dish, pricking the bottom a few times with a fork.
Bake for 15 mins.  Meanwhile, roll out the remaining third of pastry - this is the pie's lid, so feel free to decorate as you wish, just be sure to include a few pricks in the decoration to allow air to circulate while it bakes.
Fill the pastry-lined dish with the cherry and banana filling, and carefully put the lid over the top, gently sealing the edges.
Bake for a further 20 mins.
Allow the pie to cool a little before serving with vanilla ice-cream/custard/clotted cream...


Friday, 27 May 2011

Mini Upside-Down Peach Cake


When you love baking, but don't have an army of kids and dogs to feed, things can get a little dangerous... Of course, my one son would be more than happy to inhale an entire cake in an afternoon, but I do feel I have a duty as a parent to restrain his appetite for sugar.  So I end up doing what any loving, responsible mother would do: I cut him a slice, then eat the rest myself.  Like I said, this can get very dangerous.


So this morning at breakfast while I was flicking through my favourite cake book, Cakes To Celebrate Love and Life, which never fails to inspire me, I had an idea.  I'd make a mini-cake.  Substantial enough in its sliceable cake-ness, but small enough not to feel too guilty when you gobble it all up in the name of maternal self-sacrifice.


Mini Upside-Down Peach Cake (dairy free)

3 ripe peaches or nectarines, peeled and sliced
125g plain four
200g golden granulated sugar
1 tsp baking powder
1 tsp bicarbonate of soda
a pinch of salt
1 lemon, zest and juice
1 egg
75ml vegetable oil
75ml rice milk

Preheat oven to 180 degrees.
Line a 20cm cake tin with greaseproof paper and arrange peach slices in the bottom.
In the bowl of an electric mixer, combine all dry ingredients (flour, sugar, baking powder, bicarb, salt, zest).
In a separate bowl, or the measuring jug used for the oil and milk, combine all wet ingredients (lemon juice, egg, oil, milk) and mix well.
Add wet mixture slowly to dry mixture and mix on a medium speed until fully incorporated.
Pour this batter over the peach slices and bake for 45 mins, or until an inserted skewer comes out cleanish (bear in mind this is quite a moist cake).
Leave to cool in the tin for 5 mins, then turn out onto a plate (peaches slices now facing up) and leave to cool further on a cooling rack.
Be careful when removing the greaseproof paper.


PS. This recipe was self-invented and does not come from the book I mentioned.


Related Posts Plugin for WordPress, Blogger...