Sunday, 22 July 2012

Experiments with fabric paints - Part II: Celery roses


Did you know that printing with the butt of a bunch of celery produces a pretty perfect looking rose?


I can't take credit for this groundbreaking discovery... Like so many good ideas going around these days, I saw this on Pinterest. I did think it might be interesting though to compile a list of fun things to print with. Any suggestions? Off the top of my head... Snakeskin/chainmail effect printing with netting; geometric patterns by repeating a jar-rim print; okra flower stamps... Leave me your ideas in the comments below and if we get enough good ones I'll try them out and do a roundup post revealing the best results!

I used: Bamber Sew fabric paint in Opaque Red; American Apparel bandeau body; celery butt

Saturday, 21 July 2012

Experiments with fabric paints - Part I: Batman and me


Never mind the current cinematic love affair with superheroes, life with an almost four year old boy means that a good 60% of my brain activity is focused on 'Supes. OK, who am I kidding... Having an almost four year old boy gives me the perfect excuse to be into superheroes, when it was probably me who instigated his obsession in the first place! Superheroes are cool, and that's just the bottom line.

Only a matter of time then before superheroes and sewing started to occupy the same space in my brain...


These days I've been having the most amount of fun playing around with fabric paints since having been sent a bunch by the lovely folks over at Bamber Sew for me to try out. Infinite possibilities, my friends, inspiration overload... Expect a flurry of fabric paint related posts and tutorials here and over at the By Hand Blog over the next couple of weeks.

Being non-toxic and only permanent once ironed, the opaque fabric paints are perfect for young kids to begin experimenting with textiles. When my son saw me stencilling a fluorescent Aztec design onto some scrap fabric the other day, he immediately wanted a go. Instead of just giving him some paint, a paintbrush and some fabric, which would have surely resulted in mess and him getting bored after five minutes, I wanted to give him the tools to be able to create something he'd thought through himself, something he'd be proud of, that he could wear right away. Getting flashbacks of nursery school Arts & Crafts, I got out a potato and asked the boy what image he'd most like to cover his t-shirt in. His response: Batman! But of course.


I must admit, carving the batmotif out of that little potato was a lot more challenging than the standard squares and triangles we used to potato-print at school, but not impossible. With a sharp pencil I outlined the image into the flesh of a potato cut in half, then went over the line with a scalpel (Stanley knife would also do). Still using the scalpel, I carefully sliced away the potato's edge, revealing the batmotif in relief.


We had such fun doing this together and best of all my little boy was able to take complete control of his project. Nothing quite like seeing his sweet little face full of concentration and satisfaction as he made his dream t-shirt a reality! In fact, I'm almost tempted to let him loose on some white cotton and use it to make me a dress with what he comes up with!


Wednesday, 11 July 2012

DIY painted mason jars


If Summer won't come to me, then I'm just going to have to make it happen instead. It had crossed my mind to set up some kind of faux beach scene in the sitting room, complete with fake palm trees, hammock, sand stolen from the local sandpit and the sound of waves emanating from my iPod... Wouldn't that be amazing? But a bit over the top. So instead I just painted the inside of some mason jars, filled them with fake flowers and brought a dash of the sunshine into my house that way. Here's how:

You will need:
  • Some empty jars (clean and dry)
  • Glass paints
  • Paintbrush

Step 1 - Start by deciding the colours for your jars. If you want to mix the colours (I added white to mine to make them lighter) do it directly in the jar. Pour a generous dollop of the paint into the jar and mix it up with a paintbrush.

Step 2 - Swish and swirl the paint around, completely coating the inside of the jar. Drain the jar of excess paint by leaving it upside down (tip: leaving the jar to drain over a ramekin will catch the excess paint ready to be used for something else). Any messy bits can be cleaned up with a damp sponge.

Step 3 - Leave your jars to dry overnight. Preheat the oven to 160 degrees. Bake for 40 mins (be sure to double check this with the instructions on your particular paints as different brands may vary) and leave to cool before filling with flowers, pens, whatever!


Sunday, 8 July 2012

Tell me about it... Stud!

As well as all the pattern cutting and sample making going on in my studio, these days over at By Hand HQ we've been having a lot of fun with quick DIY projects. As much as I love the complete process of designing, cutting and making a dress from start to finish, it's so great to be able to break up the concentration with a bit of instant gratification. My little boy is now three and a half and very curious about what his Mama does. He'll often grab some yarn and needles and attempt to knit some socks, order me to make him superhero suits and dinosaur costumes or suggest I make a new dress to wear today, but is always frustrated by how long these things actually take! With all this quickie DIY stuff going on now however, he's found his niche. And my skull studs.

I am proud to say that this project was entirely his idea, he chose his studs and positioned them himself (obviously I did the anchoring of the spiky bits that hold them in place, and demolished my fingers in the process).

It seems the apple really doesn't fall far from the tree. I am overcome with pride. They are the coolest shoes I think I have ever seen. In fact I might have to copy him and make a matching pair for myself. Too much??

What he wore: raglan t-shirt; grey moleskin trousers; his studded plimsoles; 1984 Fisher Price roller skates


Thursday, 28 June 2012

Smells like Home

I don't know why the smell of a freshly baked loaf of bread feels like home to me... If my memory serves me well (and I have an excellent memory by the way, I have even been referred to as "the elephant who never forgets"), there wasn't a whole lot of bread-baking going at home when I was little. Brown rice and lentils, yes, but bread, no (sorry Mum!). But it is undeniable - a slice of homemade bread, still warm from the oven, butter melting, a pinch of salt, that wholesome aroma finding its way around the house = Home. Maybe it's some kind of evolutionary inherited memory... Bread = we're not going to starve. We're safe. We're content.


What follows is the recipe for the absolute basic, no frills, bog standard, goes with everything kind of wholemeal bread. Simple and delicious.

Ingredients:

  • 600g strong wholemeal bread flour, plus extra for dusting
  • 2 tsp dried yeast
  • 2 tsp salt
  • 2 tsp brown sugar
  • 400ml warm water
  • 1 tbsp olive oil

Method:

Preheat oven to its lowest setting.
Put the flour into a large mixing bowl and into the oven to warm for 10 mins.
Meanwhile, boil the kettle and measure out the 400ml water, add the oil and put aside to warm down/get less boiling!
Add the remaining dry ingredients to the warm flour and mix well.
Make a well in the flour mix and slowly pour in the warm oily water, mixing as you go to form a dough.
The dough should be firm and holding itself together - if it feels too wet and sticky add a little flour; if it feels too dry and crumbly, add a little more water.
Turn the dough out to a clean surface dusted with flour. Give your hands a little dusting too. Now start kneading your dough. Knead firmly for a good 5 mins or so, adding a little extra flour if it starts to feel sticky. You want to achieve a smoothish, elastic consistency that bounces back into shape when pinched.
Dust the bowl with a little flour and put your ball of dough back in. Cover with a tea towel or clingfilm and leave to rise in a warm spot. The dough needs to pretty much double in size, which should take about half an hour.


When the dough has risen, turn it back out onto the floured surface and quickly punch out the air. You don't need to knead it again this time.
Place the dough on an oiled baking sheet or into an oiled bread tin. Cover and leave to rise one last time, again for about half an hour.
Preheat the oven to 200 degrees.
When the dough is done rising, put it straight into the hot oven and bake for 30 mins. When it's done, it should have a nice and crisp crust, and make a hollow sound when you tap the bottom.
If you baked your bread in a tin, when it's ready take it ouf the tin and put back in the oven upside down for 5 mins to crisp up the bottom and sides.

~ Now this is the important bit - eat while it is still warm!

Monday, 25 June 2012

this morning...

...as I took the last swig of my morning coffee I noticed a perfect little frothy heart stuck to the inside of my cup. I've heard of divination by interpreting the symbols left by tea leaves, or Tasseography, but I didn't know that this form of fortune-telling can, and is, also applied to reading coffee grounds.

Now, based on my fleeting research, reading coffee grounds is a Middle Eastern tradition, typically done using Turkish coffee. The subject is asked to open their heart as they drink, focusing on a particular question or situation - much like Tarot... Obviously not done simply by drinking a milky coffee and looking at the pictures left in the cup, but whatever, I figure a heart in a cup can only be a good thing!


Happy Monday!

Saturday, 23 June 2012

The Marie Skirt, or, the kindness of others

"Pssst...what's your address please? I have a present for you ;o)"

That was the email I woke up to a couple of weeks ago from none other than Marie of A Sewing Odyssey... Fast forward one week later and I found myself sitting at the bottom of the stairs holding my breath as I unwrapped a squishy, cushion-like parcel to reveal almost 3 metres of this to-die-for Aztec print cotton jersey!


Look familiar? You may remember when Marie (aka expert of knits and Queen of fabulously printed fabrics) scored a mouth watering stash of printed jerseys from a local market, including the Aztec print shown above. As I read her post I fell more and more in love, my mind ticking with thoughts of all the skirts, tops and dresses I wanted to make with it... I left her a comment gushing over the gorgeous sweetheart tee she had just made, mentioning also how wonderous  I had found that Aztec jersey. To my amazement, thereafter followed a series of emails between us with Marie so kindly offering to see if she could find some more for me the next time she happened to be at the market. 

Marie: I am blown away by your generosity and thoughtfulness. Pretty much speechless, in fact. It really goes to show what a wonderful community we have going on here - connecting virtually over a common passion, sharing inspiration and resources, supporting and encouraging one another, all the challenges, giveaways and meet-ups, actual friendships being forged, sending each other presents for goodness sake!! Amazing. I can't thank you enough. And you totally had the vision when you saw this being made up into a maxi dress - for that's pretty much what I did! I still have a little leftover so I'll be sure to keep you posted as to what that becomes... But in the meantime, I give you: the Marie Skirt!


I'm pretty sure I'll be wearing this skirt all Summer long. A super simple 1/4 circle construction with a wide elastic waistband, it can be worn high on the waist or lower on the hip for a slouchier, Autumnal vibe - I'm thinking it's going to be amazing with my grey cabled jumper, when I finally get around to knitting the last sleeve! For now I'm loving it with a cropped kiddy t-shirt (the one I'm wearing is straight from the one and only Grand Ole Opry in Nashville, Tennessee!) and my Swedish clogs. Perfect for the warm windy weather we've been having here in London.


[I've been getting kind of irked by having to constantly photograph myself in things I've made... having to think about how I look... feeling borderline narcissistic... so much more fun to take the piss!]


Thank you again, Marie, for making this my dream come true skirt! I'll be in touch shortly for your address so I can send a little thank you gift your way...! 

Saturday, 16 June 2012

The remake of a recent make

My washing machine and I are going through a bit of a rocky patch... I'll admit I may have been a little neglectful of its needs, but this retaliation really hit below the belt:


Both fairly recent makes, less than 6 months old, both dearly loved and frequently worn. Now completely buggered. I'm especially gutted about the shirt as the fabric - of which I had just over a metre, given to me by my Mum - is irreplaceable. And it doesn't end there... Remember that black floor length jersey dress? Arsehole machine took care of that one, too. Thought it would look better with an asymmetrical hemline. I, do not.


Luckily, I was able to salvage the dress just by slicing it shorter. Then I remembered some amazing gold crochet trim I bought from Goldhawk Road...


In your face, washing machine. Put that in your drum and spin it.


Tuesday, 12 June 2012

Here comes the Bride...

Sophie & Graham

It all began in November last year. A girlfriend got in touch to ask if I might be able to help out a friend of hers who was getting married and feeling very daunted by the prospect of having to navigate the sea of bridal magazines and wedding boutiques to find her perfect dress. Not even imagining that I would end up making the dress myself, it started out as a sort of Bridal Consultation. We would meet every couple of weeks and I'd try to break up the time into manageable tasks - deciding on a shape, talking designer vs. vintage; bespoke vs. off the rail, going through fabric samples, building up a moodboard... and before long we had designed her wedding dress. At which point came the inevitable, "so, you reckon you can make this then?". Ummm, I guess so...

With three months until the wedding, I got to work on the first toile. We had loosely based the design of the bodice on a Jenny Packham dress, which involved a ruched plunging neckline and some sort of lace body underneath (which would be shop bought), and the skirt would be a simple half circle with an overlay of gathered organza.

Jenny Packham // toile no.1


So far so good. Except that we couldn't find a lace body. So the second toile was to incorporate the lace into the bodice under the ruching over the bust. We were both very happy with the lace bodice, but suddenly the ruched bust and gathered skirt looked frumpy and, well, ever so slightly matronly... 

toile no.2

Third time lucky! Toile number three saw a simpler, smoother skirt - something in between a half and quarter circle with a half circle organza overlay, with the excess slightly gathered in back. We kept the lace bodice but lowered the neckline and lost the ruching, adding little lace cap sleeves to keep her decent for a church wedding.

toile no.3

And just as soon as I thought I'd nailed it, I realised I then had to actually make the Real Thing. Capital R, capital T. No more calico, poly organza and scrap lace... We were talking ivory dupion silk, Chantilly lace and silk organza (all from Joel's). I won't even say how many pounds worth. With every cut, every stitch, I was experiencing a bizarre concoction of my heart sinking at the thought of doing it wrong, and absolute elation at the prospect of doing it right. 


As it came together it became more and more apparent that I was, in fact, doing it right! The only modifications needed after the first Real Thing fitting (at which point, let's be honest, there is really nothing fundamental that can be changed without having to start all over again) were reducing a little volume from the cap sleeves - easily done, just a bit of handstitching at the underarm - and adding a subtle lace scallop into the V-neck to soften her cleavage.

first fitting of Real Thing

finished bodice

Everything was going wonderfully. Sophie seemed thrilled, I couldn't quite believe I had pulled it off and the only thing left to do was to handstitch scallops of the Chantilly lace to the hem and train of the silk organza overlay, an absolutely blissful task which allowed me to spend long, serene hours meditatively sewing, reflecting, and hopefully infusing each stitch with love and happy visions of their future together.

But there was one fundamental component still missing: the silk covered buttons and loops I had ordered never arrived!!! With a matter of days to go until the wedding, and a wedding dress gaping open at the back, we managed to get another batch of buttons and loops made at MacCulloch & Wallis just in time. And when I say just in time, I mean that there wasn't even enough time for Sophie to try on her dress before having to get straight back in her car and race back to the country! I never thought I'd be have pre-wedding jitters on behalf of someone else, but I promise you, the night before the wedding I dreamed that the dress had fit so badly that she'd been forced to go out and buy some hideous replacement dress instead... But then I saw these pictures start to crop up on Facebook -


Thank you, Sophie, not only for trusting me with possibly the most important dress you will ever wear, but for giving me the pleasure to experience the making of something so significant as the dress you wore to be married. I wish you both all the happiness in the world. And babies! Lots of babies!!

Wednesday, 30 May 2012

DIY Couture: a launch party

Last night saw the long awaited launch of Rosie Martin's very first book - DIY Couture: Create your own fashion collection. I was lucky enough to be invited to the party (which was hosted by The Make Escape; a new monthly craft-along held at the Hackney Attic) as Rosie had featured my shoes from way back when throughout the book. As well as seeing Rosie again, another highlight of my evening was meeting Karen and Tilly, both incredibly talented seamstresses whose blogs I have followed and admired for years - but I think I may have slightly overwhelmed them with my starstruck ramblings... Sorry guys!


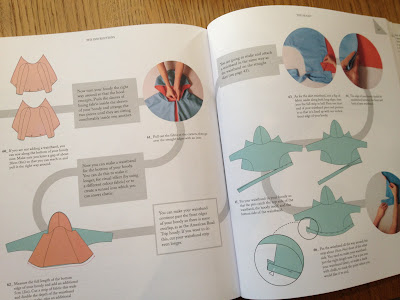
Rosie's philosophy is simple and inspired: eliminating the need for a pattern, she gives clear visual instructions showing you how to cut and sew 10 basic items of clothing, including wardrobe classics such as a circle skirt, a hoody, a pair of trousers and a Grecian dress.


Despite being an avid sewing pattern afficionado; having collected vintage patterns for the last ten years, been delighted and inspired by the new crop of contemporary sewing pattern designers, and, oh yes, having just launched our own brand spanking new sewing pattern company, I am still a huge fan of DIY Couture.  Just as I love leafing through my boxes of neatly packaged patterns, unfolding that delicate tissue paper and spending blissfully meditative hours precision-sewing, I can just as often be found ducking into my studio late at night, grabbing my scissors and some fabric off the shelf and getting stuck right in ad hoc.


What I love most, however, about DIY Couture: Create your own fashion collection is how Rosie so beautifully illustrates the versatility of home sewing, inviting us to reinterpret her instructions according to our own vision. From one set of ten staple shapes she has created eight collections, each so different from the other that you'd be forgiven for thinking they were completely different designs altogether.

Rosie's book is available to buy now from Amazon, and you can also buy her individual instruction booklets direct from diy-couture.co.uk.

Monday, 28 May 2012

Finally, the Big Reveal!

Some of you may have noticed a bit of unusual activity round these parts... Infrequent posting, sly hints at big things a-brewin'...  If you had imagined that for the last nine months I had been scheming and plotting, working late into the night, designing, sewing, writing, basically carving out my dream job - then you'd be right!  I give you... (drumroll please!) ...By Hand London.


By Hand London is an independent sewing pattern company aimed at beginner and intermediate sewists. Designing patterns inspired by the stylish women we know and admire, our brand is all about championing individual style and celebrating strong femininity. Released in bi-annual collections, it’s your own customisable fashion line!


My business partner Charlotte and I will be launching our very first collection of sewing patterns in October 2012, and until then we will be documenting the process on our brand spanking new blog, byhandlondon.wordpress.com, where we will also be talking about fashion and individual style, championing the ladies we love and are inspired by (and the boys too!), as well as sharing as many DIYs we can muster, and believe you me, the "DIY ideas" list is looooong! Having just gone live last week, the blog is still pretty bare, but swing by for a DIY fringed belt tutorial, some delicious ice pop recipes and a DIY bandeau top tutorial. I value and appreciate the opinion of you, my wonderful readers, above all, so I would be eternally grateful for your feedback and advice.


While I will be saving my more fashion/style/repurposing ideas for the By Hand London blog, I will still be posting here, with a focus on home, family, my recipes (sorry Marie!), knitting & crochet, bloggers challenges and my personal projects & makes. Basically keeping my home and working lives on separate blogs!

I can't even tell you how excited I am to get really stuck in, I have never felt so creatively alive and inspired! I only hope that our blog and sewing patterns which will be launched in October (yes, there will be a party!) will be met with the same enthusiasm and excitement that Charlotte and I feel.

PS. To all you talented sewists: as we approach the launch, we will be offering up a handful of copies of our patterns to be road-tested. To get your name in the hat, please leave a comment below!

Sacher Tortelets

Disclaimer: I am not claiming even for a second to have nailed the original Sachertorte recipe.  What follows is merely an homage to a cake not only riddled with childhood memories, but possibly one of the most delicious and elegant I have ever had the pleasure of eating.


Sacher Tortelets (makes 12)

Ingredients as for my chocolate cupcakes

plus

Apricot jam
200g dark chocolate (at least 70% cocoa solids)

Following the method for my chocolate cupcakes, prepare the mix and spoon into cupcake cases, filling them half way. Then add a teaspoon of the apricot jam and cover with a final dollop of the chocolate cake mixture.


Bake at 180 degrees for 25 minutes. Let the cupcakes cool completely on a wire rack before carefully removing the paper cases.


Melt the chocolate in a double boiler and while it is still runny, dip the tortelets in upside down, coating the entire cake, except for the bottom.  Carefully place on a plate and into the fridge to set the melted chocolate.


Once the chocolate has set, remove from the fridge and serve at room temperature with a dollop of unsweetened whipped cream.


I was very happy with how these guys turned out.  Despite being dairy-free and with a ground almond base, which I'm sure a genuine Sacher is not, they actually tasted very similar to how I remember a Sachertorte should taste.  The slightly bitter dark chocolate coating is a welcome contrast to the sweetness of the apricot jam and although the chocolate should not technically be completely hard, I like the way it securely holds these little tortelets together, snapping ever so satisfyingly as you take a bite...

Wednesday, 16 May 2012

In Dangerously Tassled Territory

I'm having a pretty intense love affair with fringing at the moment... It could quite possibly be getting out of control.  Especially when we're talking about fluorescent orange fringing and stretch denim... It wreaks of tacky cowgirl.  But it feels amazing!!


Yet another of my beloved pencil skirts (see previous variations here, here & here), this one was made from some scraps of dark stretch denim (found on eBay for a pittance), upon which I stitched rows of the 6" deep fringing.

The denim is a major first for me, not only have I never sewed with denim before but I think I may have actually once upon a time vowed never to wear/own/look at a denim skirt.  Nothing against denim skirts, I've just never liked the cut-off jeans miniskirt look, or the ~dare I say it~ slightly frumpy look of a boxy denim knee-length skirt.  But this... This is more like it!  The sculpted form of the wiggle skirt is so perfectly accentuated by the heavy stretch denim, to the point that it actually feels like wearing some kind of figure-control contraption!  And the fringe... Oh, how I love the fringe.  So bright and happy, so silly yet supremely sexy... it patters as I walk.  I can't even stand still when I wear it - it just wants me to dance!


In other news, Me-Made-May is coming along but proving a nightmare to photograph.  If I were wearing outfits like this every day, I would probably be more inclined to do daily photoshoots, but sadly most days it's just jeans + swing tops + minoru + various snoods.  So instead of boring you with mundane shots of my everyday dressing, I will do a Best Of MMM roundup at the end of the month. 

Related Posts Plugin for WordPress, Blogger...