Monday 31 October 2011

Chain Cake

Maybe it's because All Hallow's Eve is upon us, but bizarre things are going over here...

In the early hours of this morning, my neighbour popped over and handed me, rather frantically, a tupperware holding a smelly, putrid "cake-mix" called Herman.  Yes, apparently this cake-mix is alive and male.


She explained that this was a chain cake: same idea as a chain email - pass it on to 10 friends or you get nothing but bad sex for the rest of your life - but with a chain cake someone makes the original mix, divides it into four (keeps one 1/4 and passes the other three on), the recipients add to the mix and stir it for a handful of days, divide it and pass it on... I have no idea how long ago the mother-mix was conceived, and judging by the bubbles my little Herman is producing, this cake-mix is most definitely alive; and going by the stink...  undoubtedly male.

These are my instructions:


Happy Halloween!

Thursday 27 October 2011

Misty Monday Morning Kit ~ mittens & cowl knitting pattern


~ Making your way to work when it's barely even light ~ Bundling into a frozen car, still in pjs, on the school run ~  Dragging yourself + kids + dogs to the park on a miserably drizzly morning ~

Ok, so it's not yet 
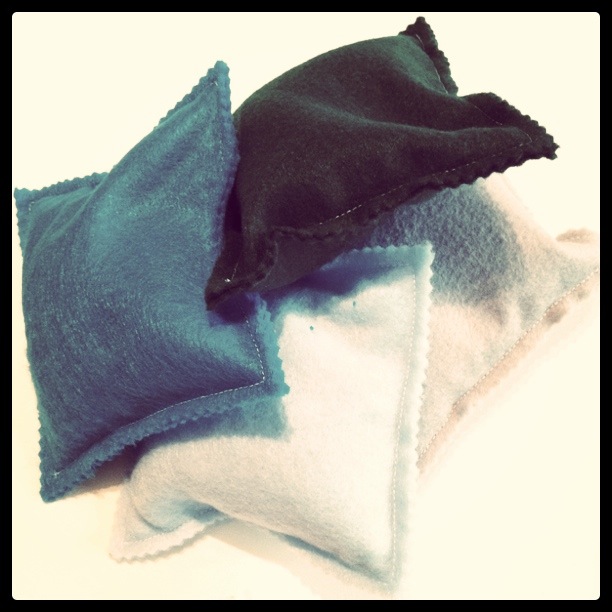
that cold here yet... But it's definitely getting there.  This winter kit knits up so fast that you won't even have time to feel the cold.  And using only 4 50g balls of Debbie Bliss Como (now discontinued so get it for around £3 a ball on eBay), we're talking unspeakable luxury for little more than £12.  I'll be keeping this set myself, but will definitely be making up a few more as Christmas gifts...


Mittens (make 2)

Size: Adult
Gauge: 10 stitches = 10cm/4"

2 x 50g balls Debbie Bliss Como, main colour (leftovers to be kept for neck-warmer)
1 x 50g ball Debbie Bliss Como, contrast colour
8mm DPNs
10mm DPNs
2 stitch markers
crochet hook (5-7mm)
yarn needle to sew in tails

Abbreviations
DPN - double pointed needle
MC - main colour
CC - contrast colour
CO - cast on
BO - bind off
st(s) - stitch(es)
k - knit
p - purl
rnd(s) - round(s)
rep - repeat
cont - continue
k2tog - knit 2 stitches together
SM - stitch marker
dec - decrease

Cuff & Thumb Gusset

Using 8mm DPNs and your CC, CO 20 sts, arrange over 3 needles (7 sts on 2 of the needles and 6 on the 3rd) and join to work in the round being careful not to twist your sts.
Work 6 rnd of k2 p2 ribbing.
next rnd: switch to MC and work a further 4 rnds of k2 p2 ribbing (10 rnds ribbed cuff).
rnd 11: switch to 10mm DPNs and knit, placing a SM in between the penultimate and last sts.
rnd 12: k1, place SM, knit to 1st SM  ~This is the set up for the thumb gusset.  If this is your first time knitting mittens, this might all sound a little scary.  It's really not - watch this tutorial before continuing to get a visual of the process~ m1 after 1st SM and again before 2nd SM.
next rnd: knit.
You will be increasing sts like this just inside of each SM to create the thumb gusset every other rnd, knitting the alternating rnds.  Cont until gusset has 10 sts.  Slip these 10 sts onto a piece of scrap yarn.

Main Body

CO 2 sts using the thumb technique onto the last needle in the rnd and join mitten, continuing with the 20 sts originally cast on.
Knit 13 rnds (or more depending on length of fingers - but you need to leave a generous inch to decrease), then dec like this:
*k2, k2tog* rep for rest of rnd.
next rnd: knit.
next rnd: *k1, k2tog* rep for rest of rnd.
next rnd: knit.
Cont until you have 10 sts remaining. Close the mitten using the Kitchener Stitch.

Thumb

Pick up 14 sts - the 10 held by the scrap yarn and 4 more to close the gap. Knit one rnd, and on the 2nd rnd, dec 4 sts by k2tog evenly spaced along the inside of the thumb - decreased sts on the outside will be visibly and make the thumb look a little odd.
Knit 4 rnds (or more depending on thumb length).
next rnd: k2tog to end.
next rnd: knit.
Cut yarn and thread onto a yarn needle.  Slip off rem 5 sts onto needle (purlwise) and pull tight. 
Weave in all loose ends.

Make a crochet loop to attach to cuff to hang mittens (optional, but if you do - chain 20).


Neck-Warmer

less than 1 50g ball Debbie Bliss Como, main colour leftover from mittens
just under 2 50g ball Debbi Bliss Como, contrast colour leftover from mittens cuff
8mm DPNs
10mm circular needle (or DPNs)
yarn needle to sew in tails

Using 8mm DPNs and MC, CO 60 sts, arrange over 3 needles (20 on each) and join to work in the round being careful not to twist your sts.
Work 5 rnds of k2 p2 ribbing. 
rnd 6: switch to CC and cont in k2 p2 rib for a further 2 rnds.
rnd 9: switch to 10mm needles and knit in stockinette st until you've almost used up your CC yarn - leaving enough to switch back to your 8mm DPNs for 2 rnds of k2 p2 ribbing.  Switch back to your MC yarn and work 5 rnds k2 p2 rib, and cast off.
Weave in loose ends.  Done!


Keep this kit by your front door and forget numb fingertips and chills down your spine (the cold ones at least!).

Sunday 23 October 2011

61 Days Until Christmas...


The fact that I like to make as many Christmas presents as possible for my significantly extended family may come as no surprise.  The fact that every year I bite off much more than I can chew hopefully would come as a surprise to my significantly extended family (I'm not going to lie - half the satisfaction comes from making it look effortless!), but I'm sure will ring a few bells with my fellow craftsters.  In the interest of staying organised, inspired, and delivering the best that not only I can muster, but absorbing the best in Christmas Crafting the blogosphere has to offer, this year I am participating in a genius scheme, made possible by the lovely Tilly, a collective of creative bloggers sharing lists, ideas and tutorials in a safe environment ~ and that means a strictly family & friends-free zone!

So if you know me well enough to be expecting a gift or two from me this year, please do not visit the Crafty Christmas Club, and maybe forget you ever read this post.  If, however, you don't know me and want to get in on the inspiration, come on down and see what your handmade Christmas could look like...

Friday 21 October 2011

WIPs

With Christmas little more than 9 weeks away, I'm already starting to feel the pressure...  And in order to keep on top of my personal projects//private commissions//present making, I seem to be making a start on everything all at once, to be worked on bit by bit on rotation, surrounding myself with the beginnings of everything I need to have done by Christmas, just so my work load can make sense to me visually.  

Herewith a little handful of my Works In Progress...


Practising piecing hexagons for a very special project that I'm keeping quiet for the time being...


Notes on a hat I've been promising my Mum since last Christmas.


The most deliciously soft beginnings of Pickles' Close Cables Sweater (for me!).


Inside view of my Swing Jacket.  Let's face it, we're talking extreme procrastination here.  All that's left to do is hand stitch the lining and sew on the buttons.  An evening's work.  I would argue that my lack of a mannequin in my life is making accurate pinning of the lining harder than it needs to be, but today my lovely neighbour Jess lent me hers.  And she needs it back soon, so no more excuses!


Some I-cord piping for a Christmassy tutorial coming soon...


And lastly, my floor this evening: hot cocoa and a chunky mitten - because my hands were freezing today, and then I thought it would be nice to prepare a quick winter warmer kit pattern (coming soon too).

~

Tip of the iceberg...

Wednesday 19 October 2011

Pine Cone Garland


Following a few visits to Kew Gardens over the last month, I have found myself with an abundance of pine cones...


...Some we painted, ready to be strung and hung as Christmas Tree decorations.  But Christmas is still 9 weeks away...


...Then I got inspired after seeing this tutorial from Twig & Thistle and made me a little pine cone garland using screw hooks and some Tyrolean ribbon my Mum gave me years ago.  It's always nice to bring a bit of the outside in, paying homage to the seasons, but despite all my efforts to greenify my fingers, most living plants I come into contact with don't last long (except my beloved Cherry Tree).  So... maybe I'll have more luck adorning my house with a plant that's already dead!


Saturday 15 October 2011

Preparing for Autumn ~ part VI

It's always a strangely bittersweet mix of emotions coming to the end of a project.  As I go ticking off the things on my Preparing for Autumn list I compiled back in July, I find myself feeling satisfied and efficient (and warm!) but also slightly sad to have to put it behind me, having enjoyed the process so much.


But really it's ok - I get to enjoy the fruits of my labour and you can be sure I have an ample supply of to-do lists in the waiting.  And that is why I can't stop crafting: my life is creative and productive, never boring, always learning and improving, a world of infinite possibilities...


My Big Herringbone Cowl, finished just in time as the temperature dropped.  I am completely in love with this stitch - so elegant and subtly interesting, unlike most knits I've seen, without an obvious knit or purl in sight.  To see the journey I've taken in the making of this snood - which began life as an old Maxmara cardi - see here.

Friday 14 October 2011

Caramel Apple Steamed Pudding or The Most Delicious Thing I've Ever Made. In My Life. Ever.


For a while now I have been aware of a distinctly fruity theme that seems to be at the heart of my baking.  Something about the way fruit reacts to being cooked, the soft squishyness of it, the way the flavours are dictated by the seasons... The silky smooth marriage of bananas and chocolate, the jewel-like glow of a plum upside-down cake, the sweet tang of baked apples... No surprise then, that my new favourite book is Rustic Fruit Desserts; arranged by season with recipes that make you want to lick the pages.

source

Since getting this book, one recipe has really sucked me in.  Maybe it's just because I love all things Autumnal, and I seem to have an endless supply of delicious Norfolk apples (thanks to a certain culinary friend)... And the Caramel Apple Steamed Pudding certainly did not disappoint.  Essentially an apple upside-down cake, but add to that a pudding mould that has been lined with homemade caramel, apple slices that have been caramelised, and a cake that has been steamed au bain marie for 90 minutes.  The texture reminded me of the sticky toffee puddings I used to have as a child at my Grandparents' house - soft, dense but fluffy (as much as I hate the word, it can only be described as moist), the sticky sweetness  perfectly balanced out by the ever so slightly tart apples.  In fact, it was so delicious that we ate in silent appreciation, with just grunts, groans and mmmm's being the only sounds to escape our lips.

Monday 10 October 2011

Fighting Crowds of Grannies...

...stocking up on supplies and overdosing on inspiration, this weekend at London's Knitting & Stitching Show at Alexandra Palace.

Quilting cottons at The Eternal Maker

Romantic chevrons at Colinette


Knit-kits at Handscape Knits

Chunky, rusty ribs at Sublime

Liberty quilting bundles at Sunflower Fabrics

Friday 7 October 2011

Beanbags - a quick tutorial


With the mornings getting a notch frostier every day, I think our days of kicking a football around the garden this year are numbered.  And while I'm overflowing with cosy, crafty indoor activity ideas for the colder months, my three year old boy still has enough energy to fuel a small tractor - and no amount of cutting and sticking and baking and story reading will sufficiently exert that energy.  I draw the line at the football in the house so I thought that soft, unbouncy beanbags would be just the thing to throw around without causing too much havoc, improve my toddler's hand-eye coordination, and most importantly, wear him out!

This is such a quick project, taking only about half an hour, and the child in your life will love being entrusted with the most important job - pouring in the beans!


You Will Need:
4 x A4 sheets of felt in different colours (or enough felt/thick cotton to cut 8 x 15cm squares)
a rotary cutter or scissors
a ruler
dried beans
pinking shears


Measure and cut out 8 squares 15 x 15cm, 2 of each colour (or you could contrast the front and back).


Using a short stitch, join 2 squares together by stitching 15mm from the edges, remembering to leave an opening big enough to pour in the beans.


Get your helper to spoon in the dried beans through the opening until you have a full and squishy (but not bursting) pouch.

Stitch the opening closed, and trim off the excess edges with pinking shears.


Thursday 6 October 2011

Monday 3 October 2011

Yuk


Looks delicious.  Smells delicious.  Tastes.  Like.  Shit.

Don't get me wrong - I'm all for healthy eating, but there's something about (specifically sweet) Macrobiotic baking that puts me off.  I just don't ever salivate at the thought of things like couscous cake with a creamed tofu carob frosting, for example.

We have this book at home, The Natural Gourmet, which, if I'm in the right mood, is very appealing.  All the talk of elements and biorhythms is right up my street.  And the savoury recipes are genuinely delicious. But today I made the mistake of trying out an Orange and Walnut Loaf Cake recipe from this same book.  I made it so lovingly and entirely by hand, not an electric mixer in sight, and feeling so pleased with myself and how I'd picked a recipe who's "Major Phase" was Earth, apparently perfect for an Indian Summer blah blah blah...  And when it came out of the oven, it looked so perfectly rustic, smelled so fragrant and orangey...  And somehow it tastes like a tasteless gluey crunchy squelch with a hint of orange.  Exactly the kind of thing you'd buy - and quickly regret - in a health food store if you were feeling a bit peckish while paying for your echinacea/wheatgerm/organic cotton tampons.  Oh well.  You live and you learn.  No more hippie baking for me.

Sunday 2 October 2011

and the winner is...

Thank you so much to all of you who entered the Swing Jacket Pattern Giveaway, and also a huge thank you for all the Birthday wishes!  So, without further ado, the lucky winner is...


...Andrea!

Please drop me a line at elisalexdcp at hotmail dot com so I can get your postal address.  Well done, and I'd love love love to see your finished jacket!

NB. I'm having a little trouble showing the random number generator... but the first number it churned out was 15 (any tips for these widgets for future reference...?).
Related Posts Plugin for WordPress, Blogger...