Pages

Thursday 28 June 2012

Smells like Home

I don't know why the smell of a freshly baked loaf of bread feels like home to me... If my memory serves me well (and I have an excellent memory by the way, I have even been referred to as "the elephant who never forgets"), there wasn't a whole lot of bread-baking going at home when I was little. Brown rice and lentils, yes, but bread, no (sorry Mum!). But it is undeniable - a slice of homemade bread, still warm from the oven, butter melting, a pinch of salt, that wholesome aroma finding its way around the house = Home. Maybe it's some kind of evolutionary inherited memory... Bread = we're not going to starve. We're safe. We're content.


What follows is the recipe for the absolute basic, no frills, bog standard, goes with everything kind of wholemeal bread. Simple and delicious.

Ingredients:

  • 600g strong wholemeal bread flour, plus extra for dusting
  • 2 tsp dried yeast
  • 2 tsp salt
  • 2 tsp brown sugar
  • 400ml warm water
  • 1 tbsp olive oil

Method:

Preheat oven to its lowest setting.
Put the flour into a large mixing bowl and into the oven to warm for 10 mins.
Meanwhile, boil the kettle and measure out the 400ml water, add the oil and put aside to warm down/get less boiling!
Add the remaining dry ingredients to the warm flour and mix well.
Make a well in the flour mix and slowly pour in the warm oily water, mixing as you go to form a dough.
The dough should be firm and holding itself together - if it feels too wet and sticky add a little flour; if it feels too dry and crumbly, add a little more water.
Turn the dough out to a clean surface dusted with flour. Give your hands a little dusting too. Now start kneading your dough. Knead firmly for a good 5 mins or so, adding a little extra flour if it starts to feel sticky. You want to achieve a smoothish, elastic consistency that bounces back into shape when pinched.
Dust the bowl with a little flour and put your ball of dough back in. Cover with a tea towel or clingfilm and leave to rise in a warm spot. The dough needs to pretty much double in size, which should take about half an hour.


When the dough has risen, turn it back out onto the floured surface and quickly punch out the air. You don't need to knead it again this time.
Place the dough on an oiled baking sheet or into an oiled bread tin. Cover and leave to rise one last time, again for about half an hour.
Preheat the oven to 200 degrees.
When the dough is done rising, put it straight into the hot oven and bake for 30 mins. When it's done, it should have a nice and crisp crust, and make a hollow sound when you tap the bottom.
If you baked your bread in a tin, when it's ready take it ouf the tin and put back in the oven upside down for 5 mins to crisp up the bottom and sides.

~ Now this is the important bit - eat while it is still warm!

Monday 25 June 2012

this morning...

...as I took the last swig of my morning coffee I noticed a perfect little frothy heart stuck to the inside of my cup. I've heard of divination by interpreting the symbols left by tea leaves, or Tasseography, but I didn't know that this form of fortune-telling can, and is, also applied to reading coffee grounds.

Now, based on my fleeting research, reading coffee grounds is a Middle Eastern tradition, typically done using Turkish coffee. The subject is asked to open their heart as they drink, focusing on a particular question or situation - much like Tarot... Obviously not done simply by drinking a milky coffee and looking at the pictures left in the cup, but whatever, I figure a heart in a cup can only be a good thing!


Happy Monday!

Saturday 23 June 2012

The Marie Skirt, or, the kindness of others

"Pssst...what's your address please? I have a present for you ;o)"

That was the email I woke up to a couple of weeks ago from none other than Marie of A Sewing Odyssey... Fast forward one week later and I found myself sitting at the bottom of the stairs holding my breath as I unwrapped a squishy, cushion-like parcel to reveal almost 3 metres of this to-die-for Aztec print cotton jersey!


Look familiar? You may remember when Marie (aka expert of knits and Queen of fabulously printed fabrics) scored a mouth watering stash of printed jerseys from a local market, including the Aztec print shown above. As I read her post I fell more and more in love, my mind ticking with thoughts of all the skirts, tops and dresses I wanted to make with it... I left her a comment gushing over the gorgeous sweetheart tee she had just made, mentioning also how wonderous  I had found that Aztec jersey. To my amazement, thereafter followed a series of emails between us with Marie so kindly offering to see if she could find some more for me the next time she happened to be at the market. 

Marie: I am blown away by your generosity and thoughtfulness. Pretty much speechless, in fact. It really goes to show what a wonderful community we have going on here - connecting virtually over a common passion, sharing inspiration and resources, supporting and encouraging one another, all the challenges, giveaways and meet-ups, actual friendships being forged, sending each other presents for goodness sake!! Amazing. I can't thank you enough. And you totally had the vision when you saw this being made up into a maxi dress - for that's pretty much what I did! I still have a little leftover so I'll be sure to keep you posted as to what that becomes... But in the meantime, I give you: the Marie Skirt!


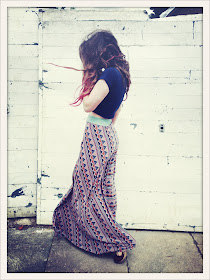
I'm pretty sure I'll be wearing this skirt all Summer long. A super simple 1/4 circle construction with a wide elastic waistband, it can be worn high on the waist or lower on the hip for a slouchier, Autumnal vibe - I'm thinking it's going to be amazing with my grey cabled jumper, when I finally get around to knitting the last sleeve! For now I'm loving it with a cropped kiddy t-shirt (the one I'm wearing is straight from the one and only Grand Ole Opry in Nashville, Tennessee!) and my Swedish clogs. Perfect for the warm windy weather we've been having here in London.


[I've been getting kind of irked by having to constantly photograph myself in things I've made... having to think about how I look... feeling borderline narcissistic... so much more fun to take the piss!]


Thank you again, Marie, for making this my dream come true skirt! I'll be in touch shortly for your address so I can send a little thank you gift your way...! 

Saturday 16 June 2012

The remake of a recent make

My washing machine and I are going through a bit of a rocky patch... I'll admit I may have been a little neglectful of its needs, but this retaliation really hit below the belt:


Both fairly recent makes, less than 6 months old, both dearly loved and frequently worn. Now completely buggered. I'm especially gutted about the shirt as the fabric - of which I had just over a metre, given to me by my Mum - is irreplaceable. And it doesn't end there... Remember that black floor length jersey dress? Arsehole machine took care of that one, too. Thought it would look better with an asymmetrical hemline. I, do not.


Luckily, I was able to salvage the dress just by slicing it shorter. Then I remembered some amazing gold crochet trim I bought from Goldhawk Road...


In your face, washing machine. Put that in your drum and spin it.


Tuesday 12 June 2012

Here comes the Bride...

Sophie & Graham

It all began in November last year. A girlfriend got in touch to ask if I might be able to help out a friend of hers who was getting married and feeling very daunted by the prospect of having to navigate the sea of bridal magazines and wedding boutiques to find her perfect dress. Not even imagining that I would end up making the dress myself, it started out as a sort of Bridal Consultation. We would meet every couple of weeks and I'd try to break up the time into manageable tasks - deciding on a shape, talking designer vs. vintage; bespoke vs. off the rail, going through fabric samples, building up a moodboard... and before long we had designed her wedding dress. At which point came the inevitable, "so, you reckon you can make this then?". Ummm, I guess so...

With three months until the wedding, I got to work on the first toile. We had loosely based the design of the bodice on a Jenny Packham dress, which involved a ruched plunging neckline and some sort of lace body underneath (which would be shop bought), and the skirt would be a simple half circle with an overlay of gathered organza.

Jenny Packham // toile no.1


So far so good. Except that we couldn't find a lace body. So the second toile was to incorporate the lace into the bodice under the ruching over the bust. We were both very happy with the lace bodice, but suddenly the ruched bust and gathered skirt looked frumpy and, well, ever so slightly matronly... 

toile no.2

Third time lucky! Toile number three saw a simpler, smoother skirt - something in between a half and quarter circle with a half circle organza overlay, with the excess slightly gathered in back. We kept the lace bodice but lowered the neckline and lost the ruching, adding little lace cap sleeves to keep her decent for a church wedding.

toile no.3

And just as soon as I thought I'd nailed it, I realised I then had to actually make the Real Thing. Capital R, capital T. No more calico, poly organza and scrap lace... We were talking ivory dupion silk, Chantilly lace and silk organza (all from Joel's). I won't even say how many pounds worth. With every cut, every stitch, I was experiencing a bizarre concoction of my heart sinking at the thought of doing it wrong, and absolute elation at the prospect of doing it right. 


As it came together it became more and more apparent that I was, in fact, doing it right! The only modifications needed after the first Real Thing fitting (at which point, let's be honest, there is really nothing fundamental that can be changed without having to start all over again) were reducing a little volume from the cap sleeves - easily done, just a bit of handstitching at the underarm - and adding a subtle lace scallop into the V-neck to soften her cleavage.

first fitting of Real Thing

finished bodice

Everything was going wonderfully. Sophie seemed thrilled, I couldn't quite believe I had pulled it off and the only thing left to do was to handstitch scallops of the Chantilly lace to the hem and train of the silk organza overlay, an absolutely blissful task which allowed me to spend long, serene hours meditatively sewing, reflecting, and hopefully infusing each stitch with love and happy visions of their future together.

But there was one fundamental component still missing: the silk covered buttons and loops I had ordered never arrived!!! With a matter of days to go until the wedding, and a wedding dress gaping open at the back, we managed to get another batch of buttons and loops made at MacCulloch & Wallis just in time. And when I say just in time, I mean that there wasn't even enough time for Sophie to try on her dress before having to get straight back in her car and race back to the country! I never thought I'd be have pre-wedding jitters on behalf of someone else, but I promise you, the night before the wedding I dreamed that the dress had fit so badly that she'd been forced to go out and buy some hideous replacement dress instead... But then I saw these pictures start to crop up on Facebook -


Thank you, Sophie, not only for trusting me with possibly the most important dress you will ever wear, but for giving me the pleasure to experience the making of something so significant as the dress you wore to be married. I wish you both all the happiness in the world. And babies! Lots of babies!!